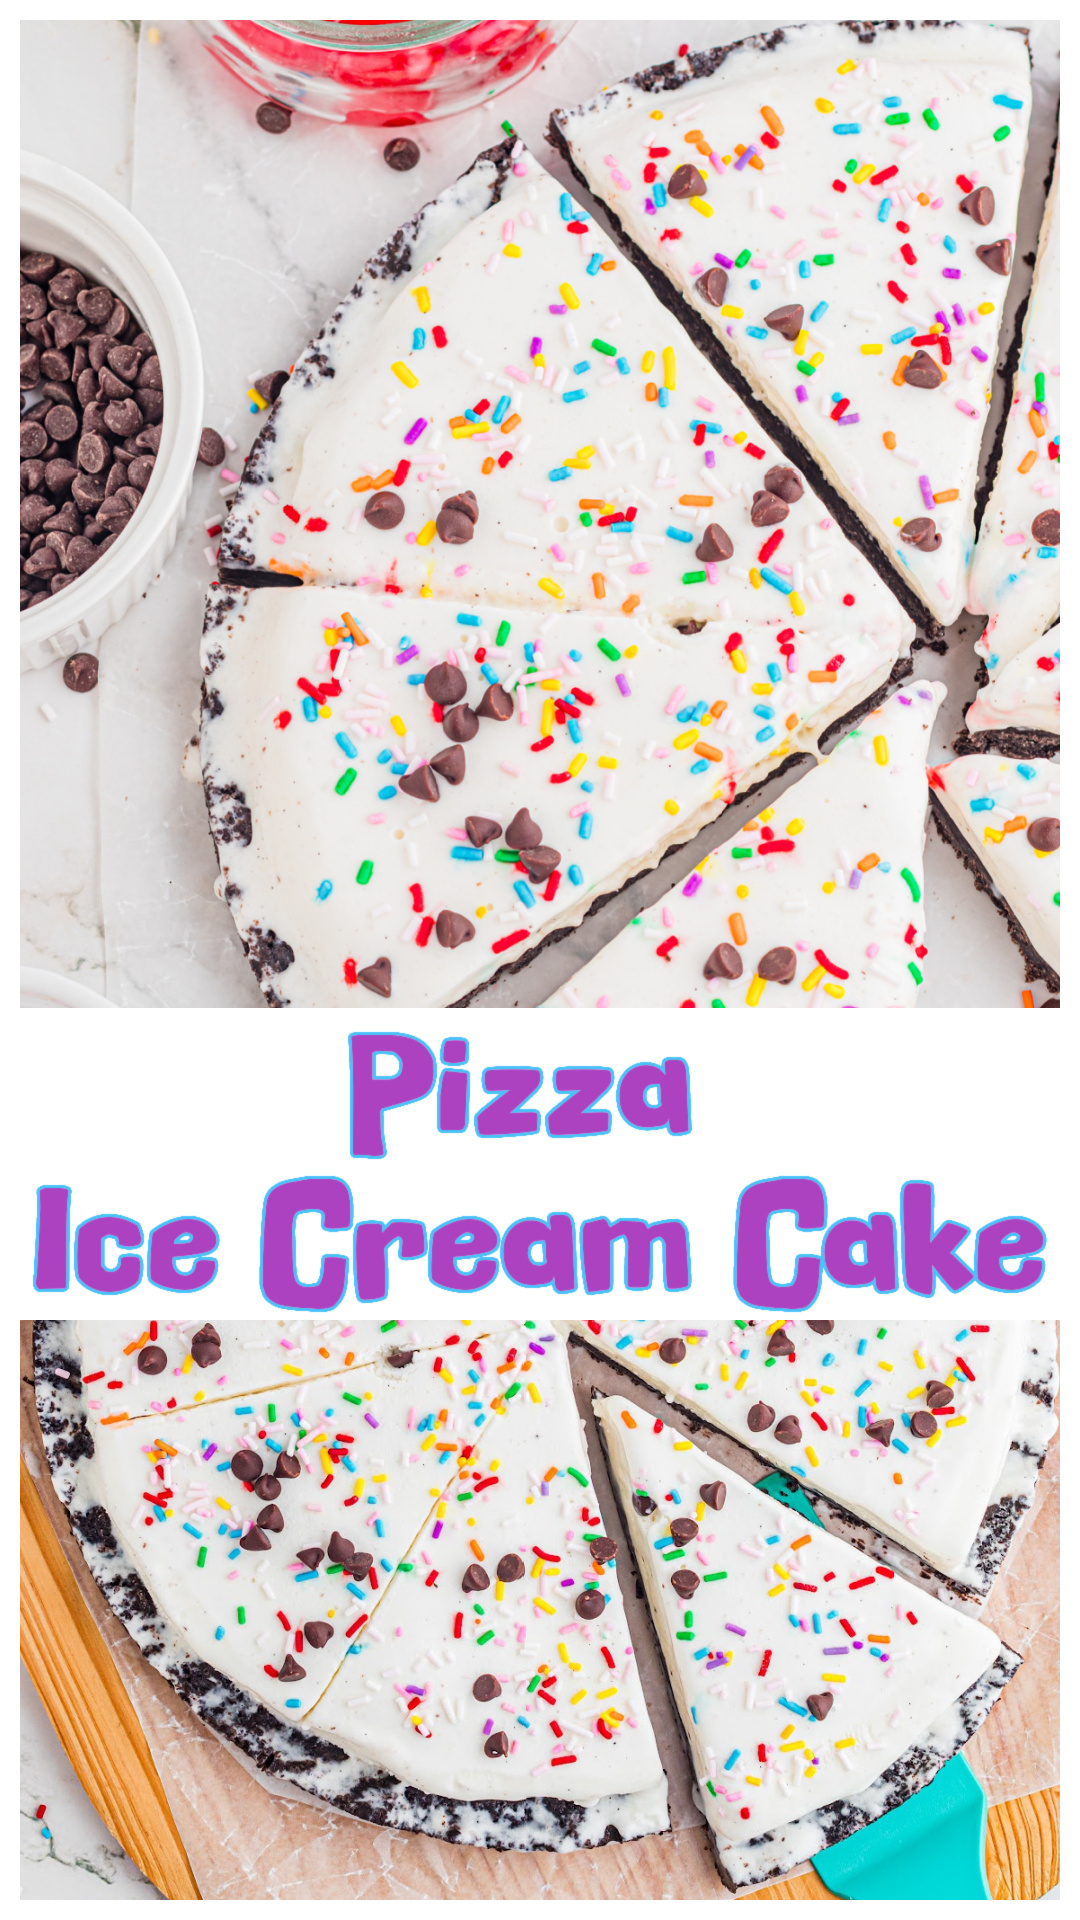
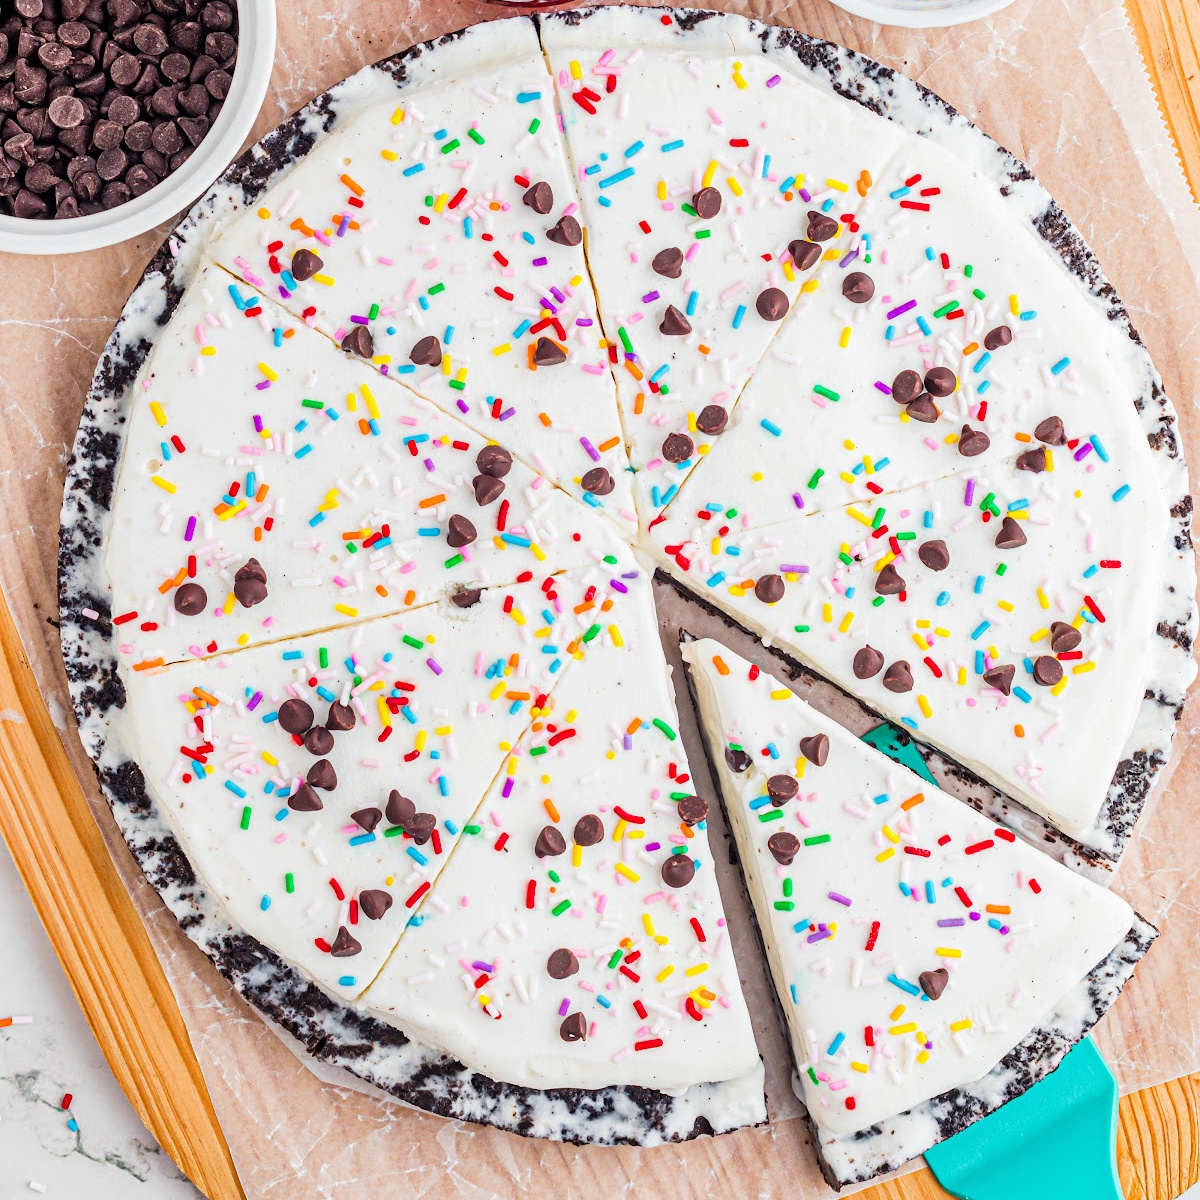
A no-bake ice cream pizza with an Oreo cookie crust and an even sliceable layer that sets up in the freezer. Add whatever toppings you want and cut it just like a pizza. It’s an easy, budget-friendly alternative to ice cream cake.

The Ice Cream Pizza I Was Trying to Explain
Ice cream pizza was the only thing I wanted for my birthday, and no one could ever figure out what I meant. I would say it every year and it always turned into the same conversation.
“I want a pizza cake.”
“You mean pizza?”
“No.”
“You mean ice cream cake?”
“No, I want it to look like a pizza.”
And then it would just… stop there.
I didn’t have a better way to explain it. I just knew I wanted something you could cut into slices like a pizza, with a crust, but cold, because my birthday is in August and I always wanted ice cream instead of cake.
What I got instead was always some version of Chuck E. Cheese and a Baskin Robbins birthday celebration, like that was what I was trying to describe.
But in my head, it wasn’t even close.
I had the whole thing pictured, in that very locked-in kid way where I could see it exactly. The slices, the crust, how it would look when someone cut into it, how you’d hand it out. I knew what it was supposed to look like.
And every year it would show up as something else entirely. And I’d just stand there thinking, that’s not it.
I didn’t know how to explain it any better than I already had, and at some point, I realized I was the only one who could see the thing I was talking about, so I stopped trying.
After a while I just stopped pushing it because I could hear it too. It sounded like I was asking for something that didn’t exist. Which I was, because someone needed to make it. That part gives me pause now.
So recently that pizza cake idea came back to me the same way, and I had this moment of, why has no one ever just made this.
So I did. I finally decided to be the person I needed back then and make it myself. So your kids can enjoy it too.
This is that vision of ice cream pizza cake I had and how to make it at home.
It’s an ice cream pizza with an Oreo cookie crust and a layer you can slice, which already puts it ahead of most ice cream cakes. You can keep it simple, or pile stuff on top. Or make a few with different flavors and turn it into a whole thing, which I fully support.
The part that makes it the most authentic is also the part that somehow never got figured out.
It’s the crust. Not the cookies, that part’s obvious. I mean where it looks like it has a pizza crust and not just ice cream sitting in a pan.
All you do is wait until it’s frozen and then go back in and take a little bit of the ice cream off around the outside so the cookie crust shows. Once you see it, you’ll understand that was the missing piece.
Now it cuts into wedges and it finally looks like ice cream pizza instead of pizza and cake trying to share the same table.
It’s super easy, and a very inexpensive alternative to store-bought ice cream cakes, and it’s what I wanted it to be the whole time.
It just took me a while to make it.

Why This Isn’t Just Another Ice Cream Cake
- You don’t need very much ice cream to make this into something. Keeping the layer a little thinner is what makes it look like a pizza slice.
- If you’re looking for a more traditional version, my strawberry chocolate chip ice cream cake is made in a springform pan and goes thicker.
- The Oreo crust isn’t just there for flavor. Once it’s packed in and frozen, it holds together. You can cut through it and hand someone a piece without it falling apart halfway there. It also gives you contrast against the ice cream layer.
- Softening the ice cream just enough before spreading is the difference between a smooth layer and one that freezes back with an icy texture. It’s a small window, but it matters.
- The whole thing comes down to going back in after it’s frozen and trimming that outer ring so the crust shows. That’s the part that makes it look like a pizza instead of a regular ice cream cake.
- You cut it into wedges, not scoops or chunks. This is the visual I wanted as a kid.
- You can keep it simple or take it further if you want. One flavor, five flavors, clean top, covered in toppings. It’s up to you.
- It’s one of those things that looks obvious once it’s in front of you, which usually means it should have been done this way all along.

Ingredients
- Chocolate sandwich cookies (Oreos) – These are the base. Once they’re crushed and mixed with butter, they freeze into a crust that holds together when you cut it.
- Unsalted butter – Melted and mixed into the crumbs so the crust sets solid instead of falling apart when you slice into it. This is how it remains no-bake.
- Ice cream – Use whatever flavor or type you want. Vanilla is simple, but this is where you can go in any direction depending on who you’re making it for.
- Whipped topping (optional) – I usually add a dollop to each slice right before serving.
- Mini chocolate chips – For texture. They add a little bite so everything isn’t smooth all the way through.
- Sprinkles – Any color, obviously. This is what makes it feel like it came straight from the ice cream shop.
- Chopped cookies or candy (optional) – This is where it can get fun. Mix, match, go too far if you feel like it.
- Maraschino cherries – Mostly for the look, but they are classic.
- Chocolate or caramel sauce – For finishing. Not necessary, but a nice add if you use it.

How to Make Ice Cream Pizza
Find the complete printable recipe with measurements in the recipe card at the BOTTOM OF THE POST.
- Step One (pan + crust)
Line a 9-inch springform pan with parchment on the bottom so you’re not fighting it later. Toss the chocolate sandwich cookies into a food processor, run them until they’re fine crumbs, then add the melted butter and pulse until it looks evenly damp and will hold together when you press it. - Step Two (press it in)
Dump that into the pan and press it into an even layer. Use the bottom of a glass or whatever you’ve got to really pack it down so it holds when you slice it later. Stick it in the freezer for 10 to 15 minutes so it firms up. - Step Three (ice cream timing)
Let the ice cream sit out just long enough to soften. You’re not melting it, just softening it enough to make it easier to spread. This helps prevent ice crystals when it refreezes. - Step Four (get it in the pan)
Scoop the ice cream over the crust and spread it evenly. Keep it level, edge to center, and you’re done. - Step Five (freeze it)
Cover it and put it back in the freezer for a couple hours, until it’s solid. Don’t hurry this part. - Step Six (the part everyone misses)
Leave it in the pan and use a knife or small spatula to lightly mark a circle just inside the edge. Then trim off that outer ring of ice cream so the cookie crust shows. - Step Seven (finish it)
Pop off the springform ring, move it to wherever you’re serving it, and add whatever you want on top. Press things in a little so they stick and don’t slide off. - Step Eight (cut it like a pizza)
Run a knife under warm water, wipe it dry, and slice into wedges. Clean it between cuts if you want it neat. Serve right away while it’s still firm.

Recipe Tips
- If your ice cream gets too soft while you’re working, put the whole pan back in the freezer for a few minutes before continuing. It’s easier to fix early than after it’s fully spread.
- If the crust starts to stick when you’re slicing, it usually wasn’t packed firmly enough or didn’t chill long enough before adding the ice cream.
- When trimming the edge, work slowly and take off small amounts at a time. Going too deep will cut into the crust instead of revealing it.
- If you’re adding heavier toppings like candy or chopped cookies, press them in gently so they stay in place when slicing.
- For cleaner slices, wipe your knife between cuts, especially once the ice cream starts to soften.
- If you’re serving outside or in a warm kitchen, slice only what you need and keep the rest in the freezer so it holds its pizza shape.

Storage
- Keep it in the freezer uncovered until it’s fully firm, then wrap or cover it so it doesn’t pick up any odors.
- If you already sliced it, leave the slices where they are or move them to a container once they’re solid.
- If it sits overnight, let it rest for a few minutes before cutting so the knife goes through without forcing it.
- This isn’t something to leave out. Take what you need, slice it, and put the rest back in the freezer.
- It’ll keep for a few days without any issue. After that, it’s still fine, but the texture starts to lose that smooth, just-frozen feel.

FAQs
- Can I use any flavor of ice cream?
Yes. Vanilla keeps it neutral, but this is where you can go in any direction. Chocolate, strawberry, coffee, whatever you like. This is where you get creative. - Can I use store-bought ice cream for this?
Yes. In fact, it works better for this. Let it soften enough to spread, then freeze it again so it sets up properly. - Do I have to use Oreo cookies for the crust?
No, but they work well because they pack tightly and hold once frozen. Any chocolate sandwich cookie or similar cookie will do the same job. - Why do I need to trim the edge?
That’s what gives you the crust showing around the outside. Without it, it just looks like ice cream in a pan. - Can I make this ahead of time?
Yes. You can make it a day or two in advance and keep it in the freezer. Add toppings closer to when you plan to serve it. - Can I make more than one flavor?
Yes, you could layer the flavors on top of each other, freezing in between each addition. - What toppings work best?
Anything that sticks and adds texture. Sprinkles, chocolate chips, chopped cookies, candy, sauces. Keep it simple or go all in.

From My Kitchen Notes
No rules here. Just observations.
- Most people didn’t misunderstand. They just didn’t want to deal with figuring it out. Things get called complicated when no one wants to be the one to solve them.
- If you had shown me this cake at nine, I would have lost my mind. Not dramatically, but in that very focused, almost suspicious way kids have when something finally shows up how they pictured it. Like, okay… yes. This is what I meant. That would have made me feel seen and understood. Two very important things for a child.
- It’s satisfying to fix something that bothered you for years and realize it wasn’t a big problem, it was just… left unresolved. You don’t always get to go back and do that.
- If you’re paying attention, the part that makes this most authentic is the part most people skip. Not the flavor or the toppings, the crust! It’s the small adjustment that makes everything else fall into place. That tends to be how things go.
- This wasn’t nostalgia. It was unfinished.
- It didn’t need a better explanation. It needed someone to do it.
- The crust showing is the entire theme. Without that, it’s just ice cream in a pan and we are not doing that.
- You can keep this simple or you can take it too far. Both are valid options. I support escalation.
- This would have solved multiple childhood problems in one move.
- Kids are usually clear. Adults just smooth it over when it doesn’t fit what already exists.
- You notice what’s missing long enough, eventually you become the one who fills it.
- At some point you realize the thing you were asking for wasn’t unreasonable, it was just inconvenient for everyone else. Most of the time the gap isn’t skill, it’s attention.
- You don’t forget ideas like this. You just get used to not expecting them to show up.
- It’s rarely the big parts that fail. It’s the piece no one looked at closely.
- There’s a certain kind of person who notices what’s missing instead of what’s there. That tends to follow them into everything else.
- Somethings don’t happen because no one decides they’re worth finishing.
- You can tell a lot by who steps forward and who stays where they are.
- It was simple. No one made it.

Frozen Desserts That Do Something Different
- Lucky Charms Ice Cream – churned cereal milk base.
- Mud Pie – coffee ice cream, chocolate layers.
- Frozen S’mores Lasagna – whipped layers, marshmallow, chocolate.
- Snickers Ice Cream Cake – made from ice cream sandwiches.
This post may contain affiliate links. Please read my disclosure policy.
Ice Cream Pizza
Equipment
- springform pan 9-inch (23 cm) Allows clean release after freezing.
- food processor For fine, even cookie crumbs.
- measuring cups and spoons Accurate ingredient portions.
- offset spatula or rubber spatular. For spreading softened ice cream evenly.
Ingredients
Oreo Crust:
- 24 regular sized Oreo cookies or other chocolate sandwich cookies
- 5 tbsps (70 g) unsalted butter melted
Ice Cream Layer:
- 4 cups (960 g) vanilla ice cream softened enough to spread
Toppings (optional):
- ½ cup (120 g) whipped topping (added to a piping bag)
- ¼ cup (45 g) mini chocolate chips
- ¼ cup (40 g) sprinkles
- chopped cookies or candy pieces
- Maraschino cherries
- chocolate or caramel sauce
Instructions
- Line a 9-inch (23 cm) springform pan with parchment paper, covering the bottom completely to make removal easier after freezing.
- Add the chocolate sandwich cookies to a food processor and pulse into fine crumbs. Pour in the melted butter and pulse again until the mixture is evenly moistened and holds together when pressed.
- Transfer the crumb mixture to the prepared pan and press it firmly into an even layer across the bottom. Use the bottom of a glass or measuring cup to compact it well so the crust sets up solid and doesn’t crumble when sliced. Freeze for 10 to 15 minutes.
- Let the ice cream sit at room temperature just until it softens enough to spread. It should be spreadable but not melted, which helps it refreeze smoothly without forming icy patches.
- Spoon the softened ice cream over the chilled crust and spread it into an even layer, keeping it level from edge to center. Aim for about ¾ to 1 inch (2 to 2.5 cm) thick to keep a pizza-like look.
- Cover and freeze for at least 2 to 3 hours, or until fully firm.
- Once frozen solid, keep the ice cream in the pan and use a knife or offset spatula to lightly mark/draw a circle about ½ inch (1.25 cm) inside the edge. Carefully trim away/pick out that outer ring of ice cream while it is still in the pan to expose a clean border of cookie crust.
- Release and remove the outer ring of the springform pan, then transfer the base to a serving surface.
- Add toppings evenly over the surface, pressing lightly so they adhere to the frozen layer. Add a dollop of whipped topping and a marashchino cherry if you like. Drizzle with chocolate or caramel sauce if using.
- Run a sharp knife under warm water, wipe it dry, and cut into wedges. Clean and warm the blade between cuts for smoother slices. Serve immediately while firm.
Notes
- Use 4 cups (960 ml) of ice cream for a thinner layer (this is the amount that makes it look "pizza like" or up to 6 cups (1440 ml) for a slightly thicker version.
- Softening the ice cream just enough to spread helps it refreeze smoothly instead of turning icy.
- Trimming the edge while the ice cream is still in the pan keeps the crust intact and creates the defined looking, "pizza crust" border.
- Pressing the crust firmly is key to preventing crumbling when slicing.
- For clean looking slices, always use a warm knife and wipe it between each cut.
- This dessert is best served immediately after slicing to maintain its pizza look.
Nutrition
Have you made this Ice Cream Pizza? I’d love to hear how it turned out — leave a comment below and let me know.
As an Amazon Associate and member of other affiliate programs, I earn from qualifying purchases.
Kat Chase says
I tried this with chocolate ice cream and added crushed peanut butter cups on top and it turned out really good. The only thing I’ll do differently next time is freeze the crust a little longer before adding the ice cream, mine softened a bit while I was working. The trimming step is what makes it, it gives you that crust edge instead of just looking like ice cream in a pan. Super fun recipe. Will be making again.
Shelly says
This worked exactly as written. I used 4 cups of ice cream and I’m glad I didn’t go thicker because it really does keep that pizza look. Pressing the crust firmly was important, more than I expected, mine held together. I also wiped the knife between cuts and that kept the wedges neat. Next time I might do two flavors layered. Thank you for this!
Erin says
Made this for my daughters birthday yesterday and it turned out so perfect. She loves pizza and she was so surprised with this. Nice and easy and afforadable. Thank you.
Hannie says
I made this for my son’s birthday because he didn’t want a regular cake and this was perfect. I used cookies and cream ice cream and kept the toppings simple with sprinkles and mini chips. The step where you trim the edge made a huge difference, it actually looked like a pizza when I sliced it. I did have to pop it back in the freezer once while spreading because my kitchen was warm, but that fixed it. Everyone wished I made a second one! Next time.
Gina says
My seven year old daughter loved this. Made it for her asa surprise and she really enjoyed it. So easy.