
These marbled peanut butter crunch bars are somewhere between a Scotcheroo, a bakery bar, and the peanut butter Rice Krispie treat you wished you grew up with. I made sure of it.

Marbled Peanut Butter Crunch Bars, Fully Committed
These are not the thin little peanut butter Rice Krispie treats wrapped in plastic that we find at the gas station. They’re thicker, softer, richer, and messy in the best possible way. So instead of melting the usual marshmallows and calling it done, I cooked the sugar first, added brown sugar for more caramel flavor, and finished them with a thick marbled peanut butter and chocolate topping that brings them closer to a bakery dessert bar than an after-school snack.
I’ve never been good at choosing one dessert category. Even as a kid, I remember watching the old Reese’s Peanut Butter Cup commercials where somebody crashed chocolate into peanut butter and suddenly everybody acted shocked that the combination tasted good. Meanwhile I was sitting there like yes obviously. Peanut butter and chocolate have always been the answer.
But eventually even that stopped feeling like enough. Because I wanted peanut butter Rice Krispie treats, but I also wanted the Scotcheroo thing, and thicker bakery bars with soft centers and chocolate swirled across the top too. Basically, I wanted all dessert limitations removed entirely, because that’s how my brain works when it comes to treats.
So these bars became my fully committed version. Thick peanut butter cereal bars with brown sugar, marshmallows, and enough chewiness that they feel substantial, finished with marbled chocolate and peanut butter across the top. Can you tell I lost all interest in holding back halfway through? The goal was always a real dessert bar rather than a lunchbox treat with ambition.
These were the bars I brought to bake sales in high school because they sold out first and looked pretty impressive sitting next to regular brownies. People think they’re going to taste like a cereal bar until they bite into them and realize they’re dealing with something much messier and far more mood-lifting.
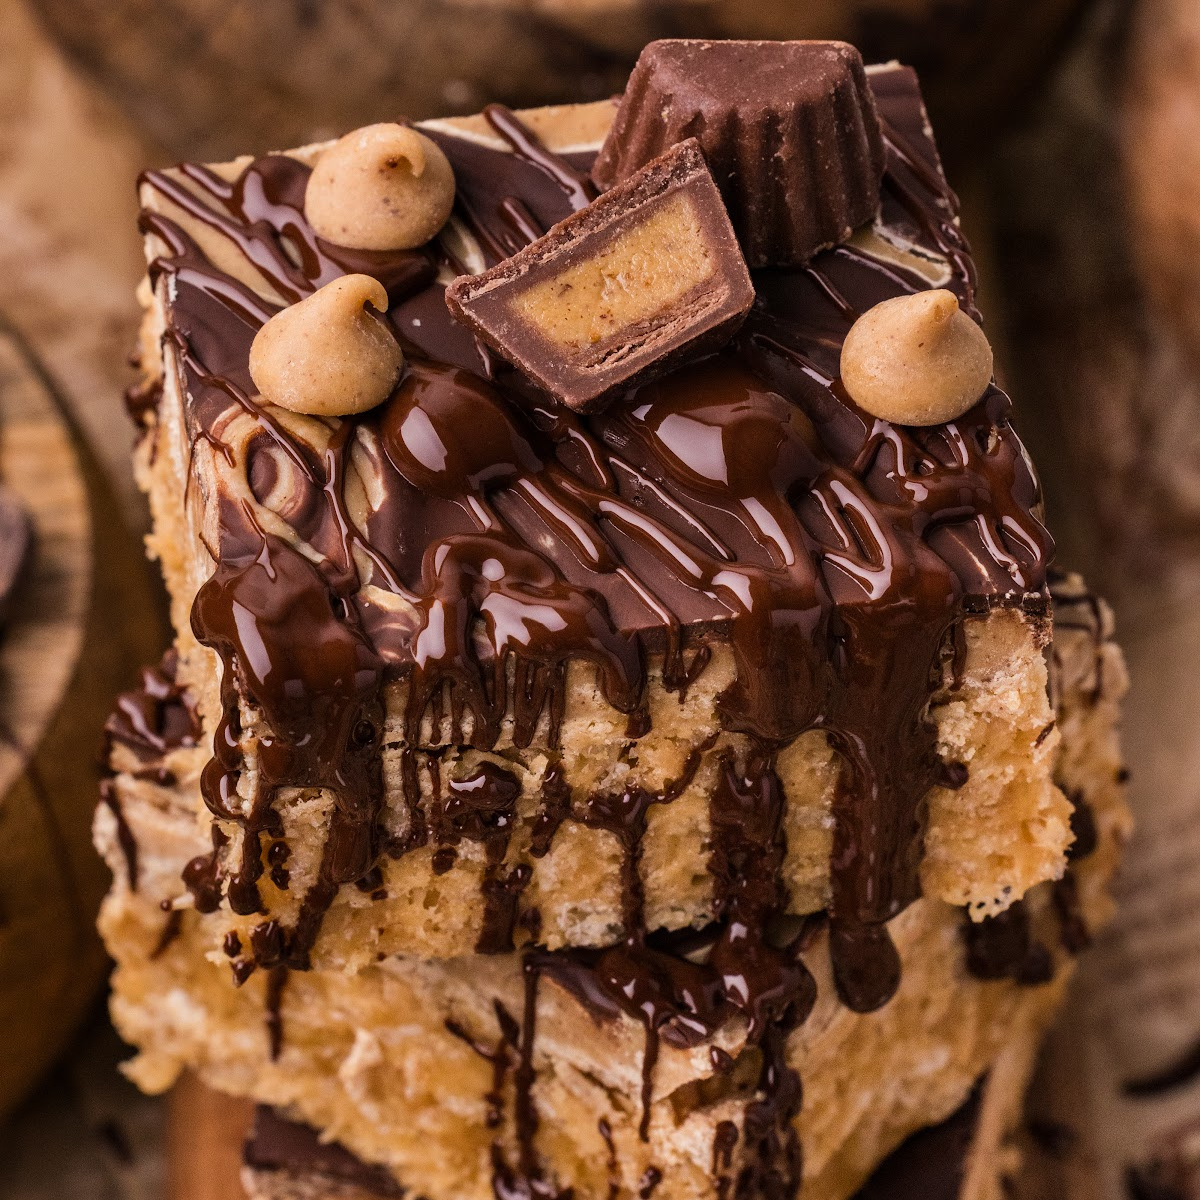
These end up thicker and much more bakery-counter-esque than the average Rice Krispie treat. The marshmallow peanut butter cereal bars stay chewy in the middle, the chocolate peanut butter topping turns into messy swirls over the top, and the flaky salt sets the standard. They’re somewhere between Scotcheroos, no-bake dessert bars, and the kind of oversized peanut butter treats you buy “for later” and then immediately eat them in your car.

What Makes These Different
- Instead of dumping marshmallows into a pan and hoping for the best, I cook the sugar mixture first with brown sugar and corn syrup before the marshmallows go in. The brown sugar adds the caramel flavor while the corn syrup helps keep the bars soft and chewy for days instead of turning into a cereal brick by the next afternoon.
- There’s also way more peanut butter happening here than in most Rice Krispie treats. I added peanut butter directly into the marshmallow cereal base, then again into the marbled topping across the top. The bars taste somewhere between Scotcheroos, marshmallow cereal treats, and oversized peanut butter dessert bars. They don’t fully belong to one category.
- The marbled top changes the entire personality. I’ve made them with a plain chocolate layer, but I think they’re too boring that way. The swirled peanut butter and chocolate topping makes them feel richer and look very much like something you’d find in a store. The peanut butter does stay softer underneath the chocolate, so the tops don’t crack into shards the second you slice them.
- I also don’t compact the cereal mixture too firmly into the pan. Pressing too hard crushes the cereal and knocks out the chewiness that makes homemade marshmallow bars worth eating in the first place. These should feel thick, gooey, and slightly ridiculous when you bite into them.
- And the flaky salt on top is a nice touch. The salt brings the peanut butter, chocolate, and brown sugar back together and taste more like a dessert shop bar instead of a bake-sale cereal square from 1987.

Ingredients
- Unsalted butter – Helps the cooked sugar mixture stay soft and rich instead of turning into stiff marshmallow glue once the bars cool.
- Light brown sugar – Adds the caramel flavor that brings them closer to Scotcheroos and bakery dessert bars instead of plain marshmallow cereal treats.
- Light corn syrup – This is what keeps the bars chewy for days and helps the marshmallow mixture stay smooth instead of turning grainy or hard.
- Mini marshmallows – Melt faster and more evenly into the peanut butter mixture, which helps create the gooey texture throughout the bars.
- Creamy peanut butter – Goes directly into the cereal layer so the peanut butter flavor is part of the entire bar instead of only sitting on top.
- Vanilla extract – Makes them better.
- Kosher salt – Keeps the sweetness from getting out of control and helps the peanut butter flavor stand out more clearly.
- Rice Krispies cereal – The puffed rice keeps the bars chewy and light instead of dense like some no-bake peanut butter bars can become.
- Chocolate chips – Make the chocolate swirl layer across the top. Stick with semi-sweet or dark.
- Peanut butter chips – Make the marbled topping thicker, softer, and much more peanut butter-forward than a plain chocolate Scotcheroo-style topping.
- Flaky sea salt – The final thing that takes these out of lunchbox treat status entirely.

How To Make Marbled Peanut Butter Crunch Bars
Find the complete printable recipe with measurements in the recipe card at the BOTTOM OF THE POST.
- Step One (cook the peanut butter marshmallow base)
Add the butter, corn syrup, granulated sugar, and brown sugar to a large saucepan over medium heat and stir until the sugars dissolve and the mixture starts bubbling. I don’t skip cooking the sugar first because it gives the bars a softer, chewier texture with more caramel flavor than the standard “melt marshmallows and hope for the best” outcome. Remove the pan from the heat and stir in the salt, vanilla, peanut butter, and marshmallows until mostly melted. - Step Two (fold in the cereal)
Add the puffed rice cereal and gently fold everything together until all the cereal is coated in the peanut butter marshmallow mixture. Try not to over-stir or compact it into oblivion because crushed cereal is how you end up with dense bars instead of chewy ones. Transfer everything to a parchment-lined 9×13-inch pan and lightly press it into an even layer without smashing it down too firmly. - Step Three (make the marbled topping)
Melt the peanut butter chips in one bowl and the chocolate chips in another until smooth. Spread the melted peanut butter chips over the bars first, then drizzle the chocolate across the top and swirl everything together with a toothpick or skewer. The marbled top is what makes these feel a little more bakery-style instead of plain Rice Krispie treat land, so don’t over-swirl it into a muddy brown mess. - Step Four (let them set and slice)
Sprinkle the top lightly with flaky sea salt, then let the bars sit until the topping firms up enough for slicing, about an hour or so depending on your kitchen temperature. Lift them out using the parchment paper and cut into squares or rectangles. These stay chewy and slightly gooey at room temperature, which is exactly the texture I want.

Recipe Tips
- Don’t hurry through the sugar mixture step. You want the sugars to fully dissolve and bubble before adding the peanut butter and marshmallows or the bars won’t get the chewy texture that separates them from basic cereal treats.
- Use fresh marshmallows! Old marshmallows melt weirdly and can make the bars stiffer instead of soft and gooey. This is not the time for that half-opened bag that’s partially stale.
- Fold the cereal in gently. If you stir or mash everything together, the puffed rice crushes down and the bars lose their crunch.
- Don’t compact the bars too firmly into the pan. Light pressure keeps the centers softer and prevents the bars from turning dense once they cool.
- Melt the chocolate and peanut butter chips slowly. Overheated chips get thick and grainy fast, which makes the swirl topping harder to marble smoothly.
- Swirl the topping while everything is still warm. Once the chocolate starts setting, the marbled swirl won’t come through as clearly.
- Flaky salt is the detail that makes a noticeable difference. These are sweet bars, and the salt keeps everything from going fully candy-bar sweet.
- Let the topping set before slicing or the bars turn into a delicious failure.
- If you want extra spotless slices, lightly oil the knife between cuts. If you don’t care, they still taste the same.
- These are better at room temperature than straight from the refrigerator because the peanut butter layer stays softer and creamier.

Storage
- These stay soft at room temperature for several days, which is one of the best things about them. Store the bars covered in an airtight container for up to 5 days.
- I prefer keeping them at room temperature because the marshmallow cereal layer stays softer and the peanut butter topping keeps that creamier bakery-bar texture. Refrigeration firms everything up more, which some people like, but it changes the texture slightly.
- If you stack them, place parchment paper between layers so the marbled topping doesn’t stick.
- You can also freeze them. Wrap the bars individually or layer them between parchment paper in a freezer-safe container. Let them come back to room temperature before eating so the bars soften again properly.

FAQs
- Are these like Scotcheroos?
Kind of, but thicker and much more peanut butter-forward. Scotcheroos usually have a firmer butterscotch-chocolate topping, while these are more bakery-style with the thick marbled peanut butter and chocolate swirl over the top. - Why are my Rice Krispie bars hard?
Usually, the cereal got compacted too firmly or the sugar mixture cooked too long. Pressing gently into the pan helps keep the bars softer and chewier. - Can I use natural peanut butter?
I wouldn’t recommend it here. Natural peanut butter will separate and change both the texture and the consistency of the topping. - Why use peanut butter chips in the topping?
They create a thicker, creamier peanut butter layer that gives everything more of that bakery dessert bar feel instead of a thin chocolate shell. - Can I use crunchy peanut butter?
You can, but the bars lose some of that smoother chewy texture. I like creamy peanut butter best because there’s already enough crunch from the cereal. - Do these count as no-bake bars?
Yes, although technically the sugar mixture gets cooked on the stove. But there’s no baking involved, which is part of why these are so dangerous to casually make on a Tuesday night.

From My Kitchen Notes
A few observations, not recipe tips.
- Some people are capable of casually choosing one dessert. I might question your rigidity if you’re that person.
- Peanut butter and chocolate together feels emotionally corrective somehow.
- Every bake sale has one tray that disappears first. You already knew which one it was going to be before the folding tables were fully set up.
- Certain cravings never mature past age twelve. They get better cookware.
- Some combinations survive for decades because they were right the first time.
- Bakery bars always feel slightly more committed than regular desserts.
- I’ve never once wanted a thin cereal treat.
- There’s something psychologically revealing about a person’s relationship to peanut butter.
- Some people want a polite little drizzle of chocolate over dessert. I want visible commitment.
- A lot of adulthood is realizing you can combine all the things you liked as a kid and nobody can stop you.
- There are people who cut dessert bars neatly with rulers and there are those of us who start slicing diagonally halfway through because the pan is still warm and appetite entered the room.
- Soft centers matter. In cereal bars and people.
- Some desserts are technically no-bake. Others feel baked by history.
- The flaky salt on top is the difference between sugar and dessert.
- Some attachments become fully integrated into your internal chemistry whether they continue making practical sense or not.
- There are certain people whose imprint eventually ends up on even your comfort food.
- Some recipes become long-standing personality traits with marshmallows added.
- The interesting thing about marbled toppings is they convince you the second piece will somehow create closure. It doesn’t.
- Some things were always meant to collide eventually. Peanut butter knew. Chocolate knew. Everybody knew. Some people still spend years pretending inevitability is avoidable.
- I do realize most food sites are giving you a cheerful little “here’s a delicous no-bake dessert bar for your family!” type of post. Meanwhile I’m handing you commentary notes on a psychologically loaded peanut butter square about inevitability, attachment, appetite, emotional projection, and visible commitment. You’re not imagining it. Frankly, this is more fun for me.

More Sweet Snack Table Treats
- Butterfinger Caramel Cheesecake Bars – caramel, crunch, creamy cheesecake layers.
- Lucky Charms Ice Cream – cereal milk ice cream nostalgia.
- Best Puppy Chow (Muddy Buddies) – chocolate peanut butter cereal snack mix.
- Peanut Butter Cheerio Bars – chewy cereal bars for snacking.
- Sugar Cookie Rice Krispie Treats – buttery marshmallow treats with sprinkles.
- Reese’s Pieces Cookie Bars – chewy bars packed with crunch.
This post may contain affiliate links. Please read my disclosure policy.
Marbled Peanut Butter Crunch Bars
Equipment
- baking dish 9x13 (23x33 cm). Gives the bars their thick bakery-style shape
- Saucepan (large). For cooking the peanut butter marshmallow mixture.
- parchment paper Helps lift the bars cleanly from the pan.
- rubber spatula Makes folding the cereal easier without crushing it.
- 2 microwave safe bowls For melting the chocolate and peanut butter chips.
- skewer or toothpick. Cretaes the marbled swirl topping.
Ingredients
- cooking spray
- 3 tbsps (42 g) unsalted butter
- 1 cup (240 ml) light corn syrup
- ¼ cup (50 g) granulated sugar
- ½ cup (100 g) light brown sugar
- 1 tsp (5 g) kosher salt
- 1 tsp (5 ml) vanilla extract
- 1½ cups (390 g) creamy peanut butter (not natural)
- 10 oz (283 g) mini marshmallows
- 7-8 cups (190 to 215 g) Rice Krispie cereal name brand or store-brand puffed rice cereal both work
- ¾ cup (180 g) peanut butter chips
- ¾ cup (180 g) semi-sweet chocolate chips or dark chocolate chips
- flaky sea salt (optional)
Instructions
- Prepare a 9x13-inch (23x33 cm) baking pan with parchment paper and lightly coat it with nonstick spray. Leave a little overhang on the sides to make the bars easier to lift out later.cooking spray
- In a large heavy-bottomed saucepan, combine the butter, light corn syrup, granulated sugar, and brown sugar over low to medium heat. Stir continuously until the sugars fully dissolve and the mixture becomes smooth and bubbling, about 10 to 15 minutes. Cooking the sugar mixture first gives these bars a softer, more caramel-like flavor than standard marshmallow cereal treats.3 tbsps (42 g) unsalted butter, 1 cup (240 ml) light corn syrup, ¼ cup (50 g) granulated sugar, ½ cup (100 g) light brown sugar
- Remove the saucepan from the heat and immediately stir in the kosher salt, vanilla extract, peanut butter, and mini marshmallows. Continue stirring until the peanut butter is fully blended and the marshmallows are mostly melted with a few soft pieces still visible. That little bit of remaining marshmallow helps create the chewy texture.1 tsp (5 g) kosher salt, 1 tsp (5 ml) vanilla extract, 1½ cups (390 g) creamy peanut butter, 10 oz (283 g) mini marshmallows
- Add the puffed rice cereal and gently fold until evenly coated. Try not to crush the cereal while mixing so the bars keep their light crunch.7-8 cups (190 to 215 g) Rice Krispie cereal
- Transfer the mixture to the prepared pan and lightly press it into an even layer using a greased spatula or lightly greased hands. Do not firmly compact the mixture or the bars can become dense instead of soft and chewy.
- Place the peanut butter chips in a microwave-safe bowl and melt in 20-second intervals, stirring between each, until smooth. Repeat with the chocolate chips in a separate bowl.¾ cup (180 g) peanut butter chips, ¾ cup (180 g) semi-sweet chocolate chips
- Pour the melted peanut butter chips over the cereal layer and spread gently into an even coating. Drizzle the melted chocolate over the top, then use a toothpick or skewer to swirl the chocolate into the peanut butter layer to create a marbled finish.
- Sprinkle lightly with flaky sea salt, if using. Let the bars sit at room temperature until the topping is set enough for slicing, about 1 hour.flaky sea salt
- Lift the bars from the pan using the parchment paper and cut into squares or rectangles. Store covered at room temperature for the softest texture.
Notes
- Do not firmly pack the cereal mixture into the pan or the bars can become dense instead of soft and chewy.
- Leaving a few partially melted marshmallow pieces in the mixture helps create a softer texture.
- Melt the peanut butter chips and chocolate slowly to keep the topping smooth and easy to swirl.
- Flaky sea salt gives the bars a sweet-salty finish that balances the richness of the peanut butter and chocolate.
- You can melt extra chocolate when serving and drizzle it over the top of the bars along with small Reese's peanut butter cups. It's completely optional.
- Store the bars tightly covered at room temperature for the best texture.
Nutrition
Have you made these Marbled Peanut Butter Crunch Bars? I’d love to hear how they turned out – leave a comment below and let me know.
As an Amazon Associate and member of other affiliate programs, I earn from qualifying purchases.
Kevin says
“Meanwhile I’m handing you commentary notes on a psychologically loaded peanut butter square about inevitability, attachment, appetite, emotional projection, and visible commitment. You’re not imagining it.” —-Oh and I’m here for it. Brilliant torture really.
Marv says
made them this morning and they are decadent as expected. Great recipe.
Cathy Pollak says
Thank you.
Karika says
These are officially my new favorite rice kripie treat. They are fantastic. marbled layer looked really pretty too.