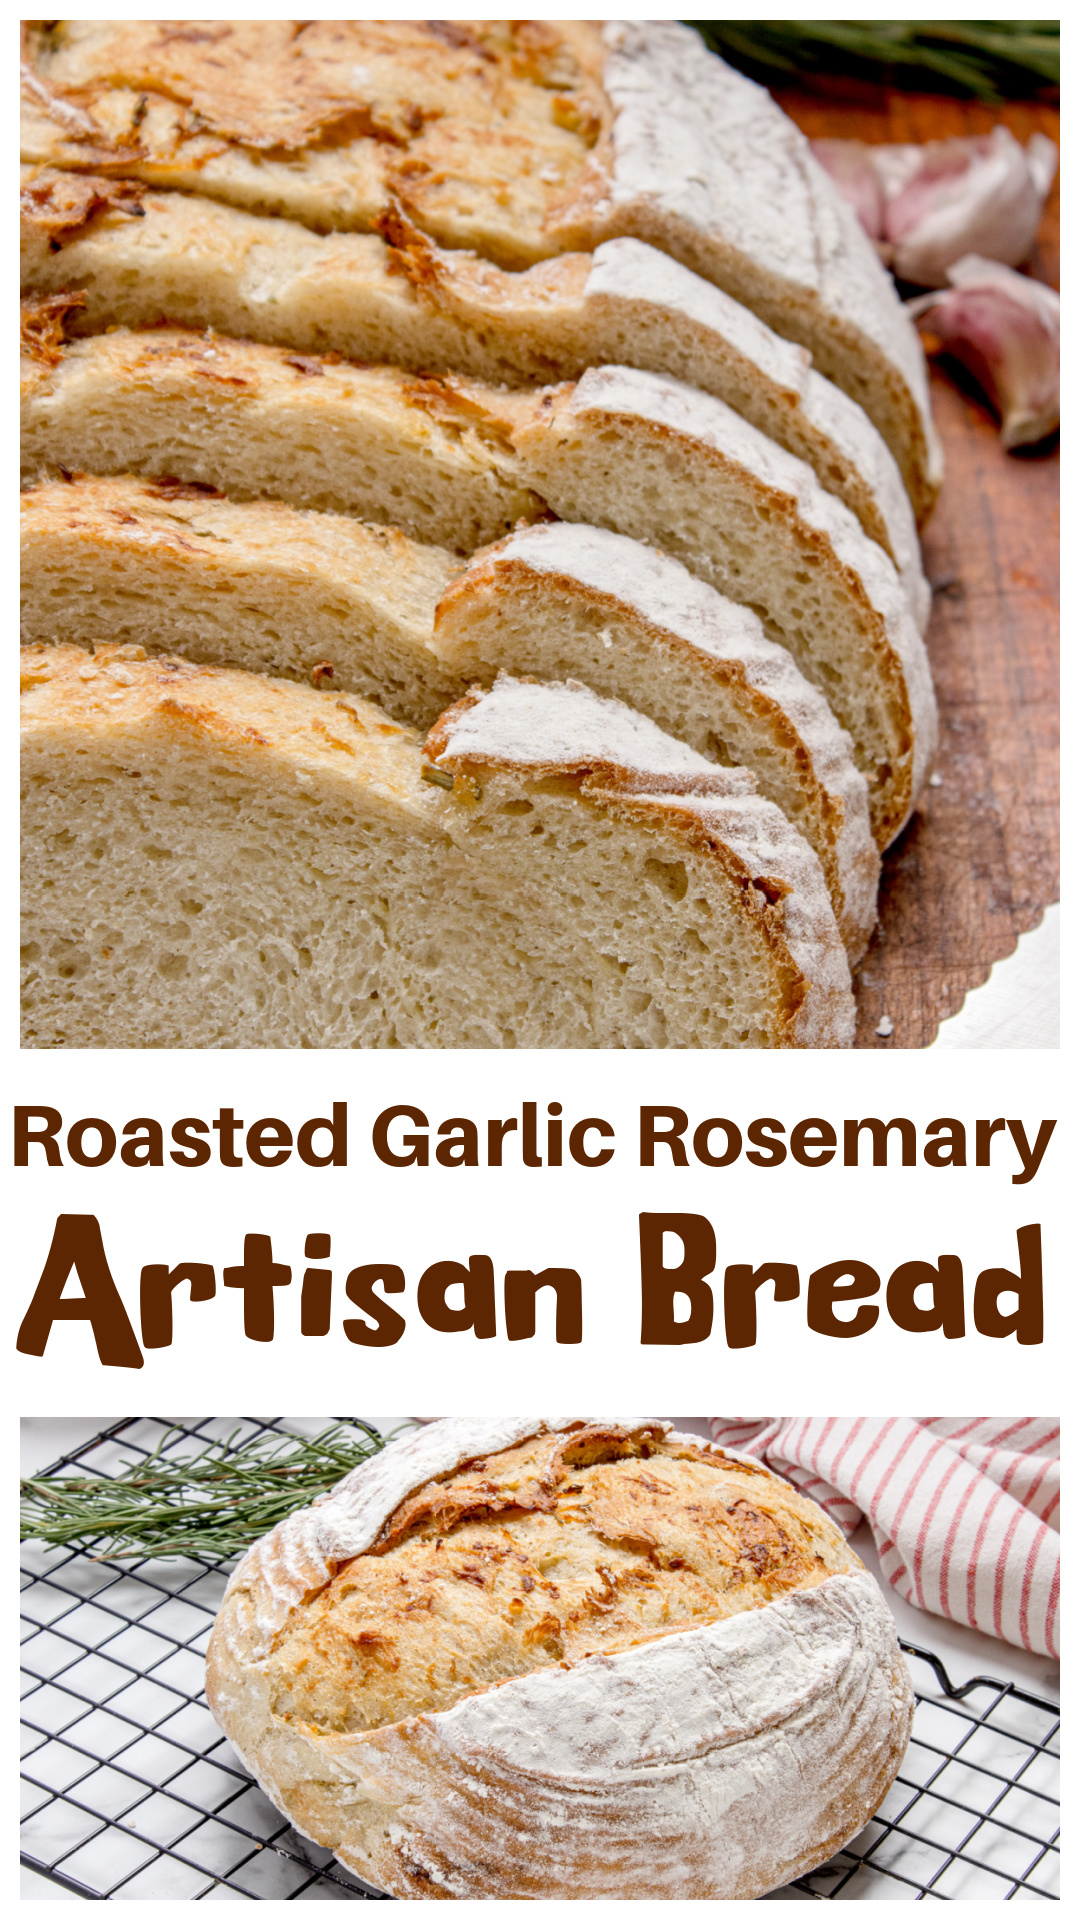
This roasted garlic rosemary artisan bread layers roasted garlic into the loaf instead of mixing it directly into the dough. The result is a crackly artisan crust with soft pockets of sweet roasted garlic and rosemary throughout.
Roasted Garlic Rosemary Artisan Bread with Bakery-Style Texture
This roasted garlic rosemary artisan bread uses roasted garlic folded directly into the loaf instead of simply mixing it into the dough. This shaping method creates streaks of sweet garlic and rosemary throughout the crumb while the Dutch oven gives the bread a golden crust and chewy artisan texture.
If you want the plain bakery-style version without the roasted garlic filling, my Dutch oven bread has the same crackly crust and artisan-style texture.
I’ve been making versions of this bread for more than twenty years now, long enough that the original no-knead recipe I started with slowly disappeared under all the little changes I kept making every time I baked it, adjusting the texture, changing the rise, working on the crust, figuring out how to make the garlic distribute through the loaf more evenly instead of punching through one slice while the next tasted mostly like plain bread, until somewhere along the way it stopped feeling like a recipe I started with and began feeling like my bread.
I used to leave the roasted garlic cloves mostly whole and knead them directly into the dough because visually it felt more theatrical, but over time I realized the flavor tasted better once I mashed the roasted garlic with rosemary and folded it through the dough layers instead. You don’t necessarily see giant chunks of garlic when you slice into the loaf anymore, but every bite tastes like roasted garlic instead of only the occasional piece carrying the flavor.
I’ve taught a lot of friends how to make this bread over the years, and at some point it became the loaf people started specifically requesting from me. One of my friends even wanted an entire bread bar for their rehearsal dinner, so I spent two straight days making around fifty loaves of a version of this bread along with a ridiculous amount of compound butter, charcuterie boards, olives, jams, and anything else that felt good next to warm bread. At one point there was so much dough proofing in the garage refrigerator that the pressure ended up pushing the refrigerator door open overnight, which honestly, as somebody with a degree in fermentation science, felt less concerning than impressive.
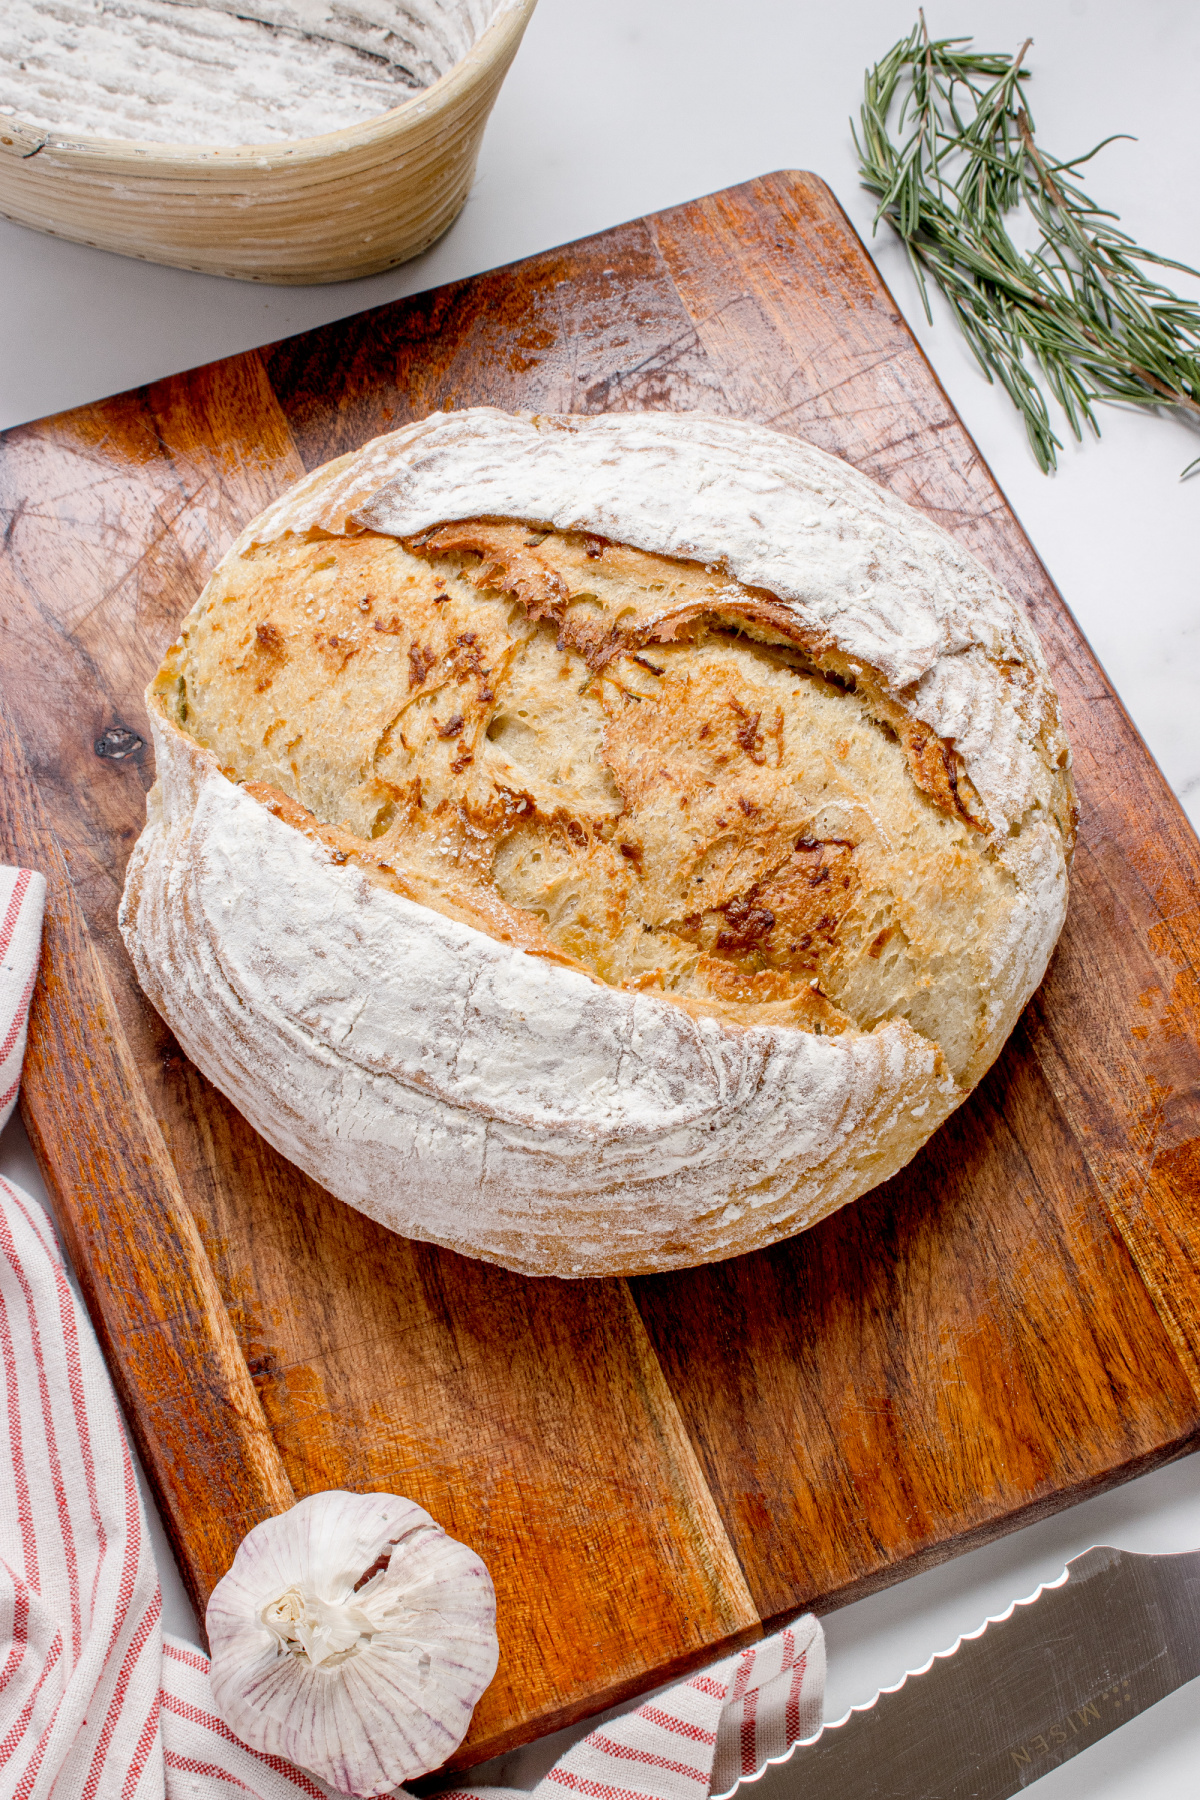
I like breads that look a little imperfect once they come out of the Dutch oven. The crust cracks, the rosemary catches in the seams, and the roasted garlic is part of the loaf in a way that feels far more interesting than simply stirring garlic into dough and hoping for the best.

What Makes This Different
- Most garlic bread recipes mix the roasted garlic directly into the dough from the beginning, which spreads the flavor evenly through the entire loaf. I’ve found this shaping method creates ribbons and pockets of roasted garlic throughout the loaf so every slice tastes layered instead of spreading evenly through every bite.
- Roasting the garlic first is important because raw garlic becomes overpowering once baked into bread. Roasted garlic becomes soft, sweet, and spreadable. It melts into the folds with the rosemary instead of working against the dough.
- Folding the garlic into layers keeps it from becoming one dense line through the middle of the loaf while also helping the bread stay lighter and airier with irregular pockets throughout the interior.
- The Dutch oven is what gives the loaf that crackly artisan crust. Trapping steam around the dough during the first half of baking keeps the outside flexible long enough for the loaf to expand fully before the crust sets. That’s what creates the crisp exterior and chewy artisan-style texture.

Ingredients
- Bread flour or all-purpose flour – Bread flour will give the loaf more chew and a slightly more bakery-style interior with bigger irregular air pockets, but all-purpose flour still makes a really good loaf if that’s what you already have sitting in the pantry. It will just be a little denser.
- Warm water – Warm enough to wake the yeast up, not hot enough to ruin its entire day.
- Instant yeast – This cuts down the rise time and doesn’t need proofing first. You can use regular yeast, just plan for it taking longer.
- Salt – Bread without enough salt does not taste good no matter how good the crust looks.
- Sugar – Enough to feed the yeast and soften the roasted garlic without making the dough sweet.
- Olive oil – Keeps the interior slightly softer and gives the loaf a richer texture.
- Garlic bulbs – Roasting completely changes the garlic. Instead of sharp garlic punches, the cloves turn soft, sweet, spreadable, and almost buttery once they come out of the oven.
- Fresh rosemary – Rosemary holds onto its flavor surprisingly well during baking, which is why it works so well in bread. The oils stay noticeable all the way through baking instead of disappearing into the dough.

How To Make Roasted Garlic Rosemary Artisan Bread
Find the complete printable recipe with measurements in the recipe card at the BOTTOM OF THE POST.
- Step One (make the dough and roast the garlic)
Mix the flour, yeast, sugar, and salt together, then add the warm water and olive oil. Knead until the dough turns smooth, soft, and slightly tacky instead of dry and stiff. Cover and let it rise until doubled while the garlic roasts in the oven until soft enough to smash with a spoon. The whole kitchen starts smelling incredible around this point. - Step Two (make the filling and shape the loaf)
Mash the roasted garlic with the rosemary until it turns into a spreadable paste. Stretch the dough into a rectangle, spread most of the garlic mixture over the surface, then fold the dough like a letter before adding the rest of the garlic and rolling everything into a tight loaf. Folding the garlic into layers instead of kneading it straight into the dough gives the bread streaks of roasted garlic flavor all the way through instead of occasional garlic-heavy bites. - Step Three (second rise and bake)
Let the loaf rise again until puffy and slightly rounded while the Dutch oven heats up. The hot Dutch oven traps steam around the bread during the first part of baking, which is what gives the loaf that golden crust and chewy artisan texture. Bake covered first, then uncover it for the final stretch so the crust turns crackly and browned. - Step Four (cool before slicing)
Let the bread cool before cutting into it even though this quickly becomes the hardest part of the entire recipe. Slicing too early traps too much steam inside the loaf and can leave the interior gummy instead of airy and chewy. Somebody usually ignores this advice every single time I make bread.

Recipe Tips
- If the roasted garlic feels especially loose or oily after mashing, add a tiny pinch of flour before spreading it onto the dough. Too much moisture can make shaping the dough messier than it needs to be.
- One confident slash across the top almost always gives better oven spring than several hesitant little cuts. Bread can sense fear honestly.
- If the dough starts shrinking back while you’re shaping it, leave it alone for 5 or 10 minutes and try again. Sometimes the gluten just needs a few minutes to relax.
- The loaf should look puffier and feel lighter after the second rise, but not fragile or overinflated. Over-proofed dough tends to spread outward instead of lifting upward once it hits the oven.
- Hot roasted garlic can weaken the dough slightly if it goes into the dough straight from the oven, so let it cool down a little before spreading it across the dough.
- Bread flour gives the loaf a chewier artisan texture, but I still make this with all-purpose flour all the time and nobody complains once warm bread shows up.

Storage
- The crust naturally softens a little by the second day because moisture from inside the loaf slowly moves outward overnight. That’s normal with homemade artisan bread.
- Keep the bread loosely wrapped at room temperature for up to 3 days. I usually leave it cut-side down on a cutting board with a towel draped loosely over the top instead of sealing it in plastic.
- Avoid refrigerating artisan bread unless you absolutely have to because the cold dries the bread out much faster.
- Slices reheat especially well directly on an oven rack or in a toaster oven because the crust crisps back up while the interior stays soft and warm.

FAQs
- Why fold the roasted garlic into the dough instead of mixing it directly in?
Folding the roasted garlic into layers keeps the flavor concentrated in ribbons throughout the loaf instead of spreading evenly through every bite. It also keeps the loaf lighter and airier than kneading the garlic directly into the dough. - Can roasted garlic make bread dough too wet?
Yes, especially if the garlic is extra oily or very soft after roasting. If the garlic mixture feels loose after mashing, a tiny pinch of flour helps absorb some moisture and makes shaping easier. - Why didn’t my loaf rise upward?
Usually either the dough was over-proofed during the second rise or the shaping didn’t create enough surface tension before baking. The loaf should look puffy and airy before baking while still holding its shape. - Can I refrigerate the dough overnight?
Yes. The dough develops really good flavor from a slower overnight rise in the refrigerator. Just let it sit at room temperature for a little while before shaping if it feels very cold and tight. - Why is my bread dense instead of airy?
Dense bread usually comes from under-proofing, adding too much flour during shaping, or cutting into the loaf before it finishes cooling. The interior continues setting as it cools. - Can I use sourdough starter instead of yeast?
Probably, although I made this recipe specifically around commercial yeast timing and dough strength. A sourdough version would need hydration and fermentation adjustments. - Why does the crust soften after cooling?
The inside of the loaf continues releasing moisture after baking, and some of that moisture slowly moves into the crust as the bread sits. Fresh artisan bread almost always has its crispiest crust within the first several hours after baking.

From My Kitchen Notes
Observations from the margins.
- The smell of roasted garlic and rosemary in a house changes people’s demeanor almost immediately.
- Bread dough is alive enough to rearrange its surroundings if you give it enough time and warmth. Draw your own conclusions.
- There are people who wait for bread to cool and people who immediately tear into the loaf while burning their fingers. Very different energy. Very different people.
- I like people who also understand fermentation. Patience, pressure, timing, holding back. Same skill set, but applied differently.
- Garlic gets sweeter the longer you’re willing to leave it in the heat.
- Some things become more powerful once they’re folded in instead of sitting visibly on the surface.
- Bread dough taught me very early that expansion is usually happening long before anything visibly rises.
- There’s a difference between feeding people and making them feel safe enough to stay awhile.
- Fresh bread pulls people into the kitchen faster than almost anything else. Nobody really resists it. They just pretend they meant to walk in there.
- There are people who can smell bread baking from the farthest room in the house and suddenly appear in the doorway two minutes later like wildlife.
- The kitchen gets strangely honest once warm bread and butter enters the room.
- Some things are technically simple but still take years before they feel natural in your hands.
- Bread baking is mostly waiting around while invisible things continue working.
- Some people circle warmth carefully before they let themselves get too close to it.
- Sometimes the thing filling the entire house is still somehow never directly acknowledged.
- Some things become impossible to ignore once they’ve spent enough time in the oven.
- You can tell a lot about somebody by how they butter bread.
- There are people who butter the entire slice at once and people who only butter the exact bite they’re about to take. Completely different upbringing.
- Etiquette classes taught me how to butter bread properly at a table. Real life usually has other plans. I still automatically move a little butter onto the bread plate first even though absolutely nobody is policing me anymore.
- Table manners are fascinating because half of them are really just lessons about managing appetite publicly. Some habits stay in your hands long after you stop consciously thinking about them.
- Warm bread has undone years of formal table training in under thirty seconds.
- There’s a part of me that still hears tiny etiquette instructions every time bread hits the table.
- Bread service becomes much more revealing once people stop trying to look composed.
- There’s something funny about spending years learning elegant manners only to completely lose interest in it around hot bread and good butter.
- Some people butter bread cautiously like they’re budgeting for winter.
- Some combinations were always going to become a thing once butter got involved.

More Bread Recipes for Bread People
- Chocolate Chip Artisan Bread – crusty loaf with chocolate chips.
- Honey Oatmeal Bread – soft hearty beginner-friendly loaf.
- Round Challah Bread Recipe – golden braided loaf tutorial.
- Homemade Slider Buns – soft cloud-like homemade buns.
This post may contain affiliate links. Please read my disclosure policy.
Roasted Garlic Rosemary Artisan Bread
Equipment
- Stand Mixer or large mixing bowl. For mixing and kneading the dough.
- Dutch Oven (5.5 to 6 quart). Creates steam for an artisan-style crust.
- kitchen scale For weighing ingredients. (optional)
- parchment paper Helps safely transfer the dough.
- Banneton or towel-lined bowl. Supports the loaf during the second rise.
- bread lame or sharp knife. For scoring the dough.
- digital thermometer Checks for doneness.
Ingredients
Dough:
- about 4 cups (500 g) bread flour or all-purpose flour
- 2¼ tsps (7 g / 1 packet) RapidRise yeast if you use regular yeast your rise times will be longer
- 2 tbsps (25 g) granulated sugar
- 1¾ tsps (10 g) table salt
- 1¼ cups (300 ml) warm water (105–110°F / 40–43°C)
- 2 tbsps (30 ml) olive oil
Roasted Garlic Filling:
- 2 medium garlic bulbs
- 2 tbsps (30 ml) olive oil
- 2 tbsps finely chopped fresh rosemary
Instructions
- Combine the flour, yeast, sugar, and salt in the bowl of a stand mixer or large mixing bowl. Add the warm water and olive oil, then mix until a shaggy dough forms. Knead with a dough hook on medium-low speed for 6–8 minutes or knead by hand for 8–10 minutes until the dough becomes smooth, soft, and slightly tacky.about 4 cups (500 g) bread flour, 2¼ tsps (7 g / 1 packet) RapidRise yeast, 2 tbsps (25 g) granulated sugar, 1¾ tsps (10 g) table salt, 1¼ cups (300 ml) warm water, 2 tbsps (30 ml) olive oil
- Shape the dough into a ball and place it into a lightly oiled bowl. Cover and let rise in a warm spot for 60–90 minutes or until doubled in size.
- While the dough rises, preheat the oven to 400°F (200°C). Slice the tops off the garlic bulbs, drizzle with olive oil, wrap in foil, and roast for 35–45 minutes until the cloves are soft and golden. Let cool slightly.2 medium garlic bulbs, 2 tbsps (30 ml) olive oil
- Squeeze the roasted garlic cloves into a small bowl and mash with the chopped rosemary until spreadable. If the mixture feels especially loose or oily, stir in a small pinch of flour to help it spread more evenly across the dough.2 tbsps finely chopped fresh rosemary
- Turn the dough onto a lightly floured surface and gently stretch it into an 11 x 9-inch (28 x 23 cm) rectangle. Spread about two-thirds of the roasted garlic mixture over the dough. Fold the dough like a letter by bringing the bottom third upward and the top third downward. Spread the remaining garlic mixture lightly over the folded dough, then roll tightly into a log and pinch the seam closed.
- Place the dough seam-side down into a floured banneton or towel-lined bowl. Cover and let rise for 45–75 minutes until the dough looks puffy and slowly springs back when lightly pressed.
- Place a Dutch oven with its lid into the oven and preheat to 450°F (232°C) for at least 20 minutes before baking.
- Turn the dough onto a sheet of parchment paper and score the top with one confident slash using a sharp knife or bread lame. Carefully transfer the dough into the hot Dutch oven using the parchment paper.
- Cover and bake for 25 minutes. Remove the lid and continue baking for 15–20 minutes until the crust is golden brown and the loaf reaches an internal temperature of 200–205°F (93–96°C).
- Transfer the bread to a wire rack and cool for at least 1 hour before slicing. Cutting too early can create a gummy interior while the crumb is still setting.
Notes
- Bread flour creates a slightly chewier artisan-style crumb, while all-purpose flour gives the loaf a softer interior.
- Roasting the garlic before layering it into the dough creates a sweeter, mellow flavor that spreads through the loaf without overpowering it.
- If the dough feels tight or resistant while shaping, let it rest for 5–10 minutes before continuing.
- A 5- to 6-quart Dutch oven works best for this loaf. Larger Dutch ovens will still work, but the dough may spread a little wider before it starts rising upward.
- The loaf is fully baked when the crust sounds hollow when tapped and the interior reaches 200–205°F (93–96°C).
- Store leftover bread at room temperature wrapped in a clean kitchen towel or paper bag for up to 2 days.
Nutrition
Have you made this Roasted Garlic Rosemary Artisan Bread? I’d love to hear how it turned out – leave a comment below and let me know.
As an Amazon Associate and member of other affiliate programs, I earn from qualifying purchases.
Ashley says
I swear by this bread. In fact, I have a loaf in the oven right now.
Cathy says
I know, they are just the greatest books and make bread making so easy for everyone who thought they could never do it.
Meghan says
You had me at roasted garlic! Looks incredible, Cathy!!
Cathy says
Thanks Meghan.
Alice @ Hip Foodie Mom says
Damn, this bread looks good! Totally going to bake this!
Cathy says
Thanks Alice!
Carole Penner says
Any possibility of making this bread gluen free? I’m not allergic but I’m always looking for
options.
Thanks.
Cathy says
Try it and let us know how it goes.
Mike says
Why eliminate gluten? It has the protein in wheat, holds the bread together. I wish the food/health faddists would leave us alone to enjoy good food without driving the cost of it up. Very few are truly allergic to it but they demand it’s elimination.
Deborah says
perhaps few are really allergic
to gluten, but if you are one of the few, it is a big problem.
Penny says
I understand Mike. This fad is just crazy. In the 1800’s and before bread has always been around. I don’t recall this allergy a concern. Gluten is what makes the bread. It is more natural than the chemicals that have been introduced into our foods. Basically I understand wheat and barley to be very healthy…why eliminate it? I really don’t think it is an allergy, I think it is something else beyond that. Just because a doctor said so…ummm we all need to do some research on our own. Just my opinion, not looking change anyone, just wanted to make my own point.
B Theilman says
That’s because the people with celiac died before the 1800s. Same as with T-1 diabetics. The people with autoimmune disorders didn’t live to breed.
Ethel says
The problem with most people and gluten is that the more hybridized the wheat the worse the gluten is for people who are sensitive to it. I can eat the Einkorn wheat without a problem as it is the original wheat. However, eating too much of the regular and I am miserable! Not my choice at all but it is a fact so you can have your wheat with the not so nice gluten and I will use my Einkorn. We will both be happy. It is not a fad for me and many others at all but a necessity! Celiac may still be sensitive to what gluten is in there tho.
WJJBP says
Celiac disease is real. It causes severe malnourishment, bleeding gums, cankers sores, fatigue, fatty stools, constipation, etc. It’s not a fad.
But unless you’ve been diagnosed with celiac, there’s no reason to avoid gluten.
Yo says
I’m a GI RN and only 1% of the population has true celiac disease. There are blood tests that show antibodies to gluten but a biopsy needs to be done to confirm. Lots of people who claim to be allergic to gluten but it seems to be more like the “in-thing”’ than an actual allergy. My daughter’s friend being a case in point who insisted she was allergic and was offended when I told her she needed to be diagnosed. She finally went to a GI specialist and was tested and she was not even gluten sensitive. It’s a horrible fad folks. If you really think you’re allergic get tested please. Gluten is good for us.
Laura Jane says
I made it with a gluten free bread flour with a simple 1 to 1 ratio. It has incredible flavor! I found out I was allergic to gluten about 8 years ago and about almost cry with relief and joy when a bread recipe not only works out but is delicious… This was one of those recipes!!!
Scotty Beyer says
Heck yeah! Now I gotta make it
Ashley says
This sounds so good – I love anything with rosemary and then combined with homemade bread? Yumm
Mama's Gotta Bake says
This recipe looks great. I love the combination of roasted garlic and rosemary. Can’t wait to make it as I love homemade bread! I really enjoy your writing also. Great blog!
Kyddryn says
Ooooh…as soon as I can buy groceries I am going to make this! Mouth…watering…
Shade and Sweetwater,
K
Sara Tetreault says
Hi Cathy!
This looks delish!! What about whole wheat flour? I really like to use BRM whole wheat flour for all of my baking. Have you tried any of these recipes with anything other than bread flour? What’s your take on bread flour? Absolutely necessary?
Thanks!
Cathy says
I always prefer bread flour because it makes a fuller rounder loaf while all-purpose makes a denser, flatter loaf. The higher protein bread flour just gives a better result and a lighter and airier bread. I haven’t made this with wheat flour, it will be very dense.
Sara T says
If we were to use bread flour how much would we use?
Cathy says
The recipe is written for bread flour.
Kristen says
Oh wow Cathy… this is one gorgeous loaf of bread. I bet your house smelled heavenly when it was baking!
Cathy says
Thanks Kristen!
Helen says
Has anyone tried this without the garlic and rosemary? Trying make one of each to please the picky eaters in my house. Thanks
Cathy says
I make it all the time plain, it’s just as yummy.
Lisa says
I made the bread (with 1/2 the cheese and rosemary, what I had) and I thought I did everything right and it tastes great and looks lovely and brown but it is not done inside. I haven’t baked a lot of bread, is 30 minutes at 450 long enough usually?
Bob says
Love these flavors, can only imagine the bread is awesome.
Sarah Park says
I would love to try this one. I love the smell of roasted garlic.
Mackenzie {SusieFreakingHomemaker} says
I love roasted garlic! I MUST try this! You make it look easy!!
Theresa setzer says
This was my first attempt at homemade bread! It was perfect.
Alycia says
Can I use all-purpose flour in this recipe? Would it still turn out okay?
Cathy says
You can.
Alycia says
I see. Thanks for the input! I’ll just get some bread flour. No sense in wasting a bunch of time, energy, money and ingredients on something that doesn’t turn out fabulous!
Mandy says
Thanks for the recipe! It’s super easy and turned out wonderful! I added some olives and sun-dried tomatoes, and it’s absolutely delicious. I’ve booked marked your blog, and I’ll definitely be back. Thanks again!
Cathy says
So glad to hear it!
Maria says
Could u make this in metal bread pans? I want to make a garlic bread for this school lunch i’m putting together, but I need it to be a long skinnier load instead of the round one. Is that possible & would it change the cook time?
Cathy says
I’m sure it would change the cook time and you would lose the artisan crust around the sides. It’s something you would have to experiment with.
steve says
Sounds great but one question from a guy who never baked a loaf of bread in his life.
Cathy says
Yes
steve says
Thank you for such a quick reply!
Kim says
I baked my first loaves of this for dinner last evening…what a treat! I divided the dough in half and made one container with the roasted garlic and rosemary and for the other loaf I used the roasted garlic and sliced jalapeños (from the jar).
Thanks for sharing this wonderful recipe!
Stephanie says
Hi Cathy,
This recipe looks great! Quick questions, Do you need to refrigerate it over night? Idk if I can wait that long, also if I want to cook one loaf now and one on another day, how long can it sit in the fridge for?
Danielle says
Would this work with dried rosemary? I planned to make this today but of course the store was sold out of fresh rosemary. If so, how much would you use?
Cathy says
It depends, ground, dried leaves?
Danielle says
Dried leaves
Bethany says
Made this recipe today. I would like to have more garlic flavor next time. I allowed it to rise for three hours and then popped it in the oven. It was so delicious. I love the crust.
megan says
wow! this is one of the first breads i’ve ever made, and it came out great! like cathy says, if you use all purpose flour rather than bread flour, it will still come out nicely, but it is definitely denser than the bread pictured. it’s still delicious! the butter really does bring out the flavor of the garlic and rosemary, as well.
Sara says
Hi! I made this bread last weekend and it turned out amazing! Thank you so much for posting! I made another batch tonight, only this time I added fresh lavender to the garlic and rosemary. I’ll bake it tomorrow, but I can say right now that it smells absolutely wonderful!
AEM says
I made this recipe today with great success! Instead of fresh I used crushed, dried rosemary and also about twice as much roasted garlic, which I smushed up pretty well before adding to the dough. My only mistake was forgetting to score the loaf, but it still turned out great. I’ll definitely be making this one again. Thank you!
Cathy H says
What is granulated yeast? If I use active dry or quick yeast is that ok?
Cathy says
Same thing.
Megan says
I made this bread for Thanksgiving and it was a HUGE hit! Everyone LOVED it! But more importantly about three days later I come home from work and there was rosemary and 4 bulbs of garlic on the table. When I asked my fiancé why it was there, he looked at me sheepishly and said ummmmm well uhhhh I was going to make stew tomorrow and thought that the bread would be a good addition. I couldn’t help it, he loved it so much, how could I NOT make it!
Kerry Kempinski says
Kathy,
I was wondering if you have ever doubled this recipe and made smaller loaves? I have seven smaller loaves I have to make.
Kerry Kempinski says
I’m sorry. I spelled your name wrong. 🙁
Jessica says
This looks great and I’m looking forward to trying it. One question: Can you halve this recipe? I just want to make one loaf.
Cathy says
Make the whole recipe and only tear off as much as you want to make. The rest of the dough will be fine in the fridge for a week…longer if you leave out the garlic.
Kimberly says
Could you put this in the freezer to chill it to speed the refrigeration process?
Cathy says
Hmmm, I have never tried that and I don’t think I would.
Nancy says
Can I half the ingredients and make in a bread maker?
Cathy says
I have never done that so I’m not sure. I really don’t think you’ll get the same result with a bread maker.
RachF says
My Italian husband, who loves garlic and rosemary, and I are in the processes of making this bread. His first time, I’m just the helper….can’t wait to try it tomorrow!
Jeremiah says
So I am just about to put this loaf in the oven. My question is why no oil or sugar. I must have read the recipe a dozen times thinking there might be an error. I said what the heck can’t hurt to try. Does dough react differently with out sugar or fats. I thought it was sugar that activated yeast. And that it was sugar that caramelized the crust.
Missy says
Hello! I can not wait for breakfast, I have the dough resting and it will be going into the fridge tonight 🙂 My question is can it be baked on a pizza stone, or should I use a metal tray?
Thank you in advance, my mouth has been watering since I discovered this recipe!
Cathy says
I have never baked it on a pizza stone so I can’t really comment. Sorry!
Anna says
How long am I able to leave the dough in the fridge for before baking it?
I don’t think I’ll finish two loaves by myself over the next few days!
Anna says
Oh wait! I just read above and saw that you said it’s ok in the fridge for a week. Thanks!
Janice says
Made the bread, but dough was so “loose” it wouldn’t stayed formed in ball, spread out on baking sheet. I wanted a thick dough ball to create a bread for slicing….what do you think I did wrong?? Baked first half of dough, was good, left remaining half in frig, tried it a couple days later, was even more loose…still tastes great, browned nice, but doesn’t look like your pic!
Cathy says
Sounds like something went wrong. Too much water? I make this recipe over and over again so I know it’s solid. It must be refrigerated over night before baking. The dough is very sticky but it bakes up nicely.
Leon Gilner says
I wanted you to know that after I read your comments on Artisan Bread in 5 minutes, I just had to buy the books. It has now been several months, and I have baked dozens of different breads with some of my own variations. I had never baked bread before and I now I am baking every week. My wife must stop me temporarily when we have no more room in the freezer. Furthermore, I have infected at least a dozen of my friends with the baking bug. As you said, it has changed my life. Many thanks and thanks for all the superb recipes.
Cathy says
So glad to hear it!!
Willsie says
Can’t wait to try this. I have a very, very silly question. You mention buttering the bread to make the rosemary and garlic flavors pop – what kind of butter do you recommend – e.g., what brands do you favor, do you whip the butter? If so, do you add anything while whipping? It sounds silly to ask such a basic question, but there are times when butter is bleh, and other times when it is simply divine. I’m still trying to figure out the divinity part.
Carrie says
I much prefer salted butter over unsalted. It brings out the flavor of the bread better. Unsalted to me is, as you said, “bleh”. I don’t find much difference between brands but I’d pick a name-brand not generic. Hope that helps!
Joanne Coulter says
It was so easy to put together, but the bread did not finish cooking inside !! How much space did you leave between the bread and the water pan ???
Cathy says
The water pan is there for a crunchy crust. It sounds like your oven might not be hot enough. Next time I would try cooking a little longer, 5-10 minutes depending on how much it didn’t cook.
Alexandrea says
I can’t wait to try this recipe! Can I freeze the bread to save it for a later time? Do I freeze the cooked bread or the dough? I’ve never made bread so I don’t know what I’m doing! Any advice is appreciated! Thank you!
KL Green says
I made this last weekend! It turned out great. I halved the recipe to make one loaf. After one day it still seemed to watery and very sticky, so I added a little extra flour. I was wondering if one should knead it after the fridge, but decided to keep it minimal. It was a little flat (not very flat, but a little flat). But it tasted great, the appearance was generally excellent. I plan to try again very soon.
https://www.facebook.com/photo.php?fbid=10152433456313193&set=a.10151576345268193.1073741829.726983192&type=3&theater#!/photo.php?fbid=10152433457198193&set=a.10151576345268193.1073741829.726983192&type=3&permPage=1
Cathy says
This is a recipe you don’t want to halve, it doesn’t work as well. The dough can sit in the fridge for two weeks so pull off one chunk at a time and bake the other later. Also, did you use a scale to measure your flour, it gives a better result. The dough is very, very sticky, use flour on your hands to shape it. Try taking it out of the fridge maybe only 10 minutes before baking and shape and see how it goes.
KL Green says
Ah…okay…thanks for the tips! I did not use a scale. I like the idea of keeping it in the fridge for a week or so. I make bread by hand every weekend and this could save time.
Sarah says
Hi Cathy,
Have you ever made this without roasting the garlic first, just using raw whole cloves?
Cathy says
Oh no, don’t do that…eeks.
Sharon says
I believe you are in the US
I am in Canada and wonder if you have heard from anyone Canadians who have used regular AP flour from here for this recipe? Higher gluten content in our winter wheat so I am thinking it may perform nearly as well as your bread flour
Cathy says
Can you not get bread flour?
Roger F says
I followed the recipe to the letter and it came out awesome. Very easy and the variations of embellishment (olives, pepperoni,sun dried tomatoes, herbs, etc.) is limitless. Thanks for the recipe.
Mariela says
Do you leave the pan with the water in the oven while the bread is baking?
Cathy says
Yes.
[email protected] says
I made this bread yesterday and it turned out great- but the times on rising and chilling the dough seemed totally arbitrary and bizarre to me. I let the dough rise till doubled (about an hour and a half on top of my warm oven) as I would with any normal bread recipe and only popped it in the fridge for about an hour before baking and the bread came out perfect- fluffy, nicely shaped, and with a great taste. The dough is quite sticky, but since the recipe doesn’t call for any kneading that isn’t really a problem- just be sure to flour hands/dough ball generously when shaping. If anyone else is wondering if they can cut down on the times (especially that overnight chilling recommendation), my experience says yes. Thanks for a delicious (and easy!) new recipe!
Cathy says
I’m glad it worked out for you this time, but for consistent results I would stick with the recipe directions. I have made at least 500 of these loves and have found that doing it any other way really skews with the results. Thanks for sharing your experience though.
Tricia Lee says
I’m with you Cathy, I made it last nite,let it raise the 3 hrs then in fridge overnite. Went about my routine this am and finished the bread….awesome…thank you so much for the recipe. I’m going to check out your other bread recipes also.
Claudia Maurer says
Could this recipe, either as is or without herbs, be used to make focaccia? The taste is outstanding!! How about pizza crust? The taste, the ease of making, the results….well, it will be a staple at the home. Amazing bread that sure made me a hit with the family! Thank you for sharing such a great recipe.
Cathy says
If you try it, let us know. I haven’t.
But I do have a great Focaccia recipe https://noblepig.com/2010/04/easy-homemade-focaccia-bread/ and an awesome Quick-No Fail Pizza Dough you could also try https://noblepig.com/2013/04/quick-no-fail-pizza-dough/ if it doesn’t work out.
Cathy says
Oh and yes you can leave out the rosemary and garlic if you choose. Still tastes awesome.
Ece Zeynep Unutur says
I think I missed something. Read the recipe several times but still can’t get the filling metal tray with water and putting the dough in another tray. How do I do it? As for as I got, I fill a metal tray with water then place it at the bottom of the oven as I’m preheating it then when the oven is ready put the dough in another buttered baking tray then put it on the middle of the oven. Is that it? If it’s not I would love some detail. Thanks! Great recipe by the way.
Cathy says
That is exactly right. The water heats up and produces steam for the crust. It stays in the oven while the bread bakes on another tray.
kl green says
I’ve made this bread about a dozen times now. Always a great success. I’ve discovered a difference in appearance and texture between using bread flour and all purpose. Tastes great either way, but the bread flour gives a fluffier loaf, at least when I bake it as a boule. Sometimes I make it in regular bread tins and it works well that way too.
Mary says
When your recipe say “buttering the bread once really brings out the flavor of the garlic and rosemary”….are you saying to butter the slice of bread or the whole loaf after it comes out of the oven?
Cathy says
The slice of bread.
Jax says
Could I put this in the bread machine on the dough cycle to mix it?
Cathy says
I don’t know why you would. It takes not even two minutes to mix it up by hand.
Pamela says
Have my roasted garlic in reefer & a rosemary plant in garden–just have you get the bread flour! Can’t wait!!!
Ece Zeynep Unutur says
I have to cook this tonight so can I not put it in refrigerator overnight and put it in the freezer for a few hours would that work as well?
Cathy says
Never tried that so it’s hard to comment on that.
Carole Reader says
Easy artisan roasted garlic and rosemary bread recipe….. AMAZING! Great with a hearty bowl of soup or stew!! Highly recommend!
Karen @ The Food Charlatan says
You might melt yourself…lol Cathy! Totally trying this one out!
Megan says
I was wondering, how deep into the dough should i cut the “X”?
Thank you
Cathy says
You can go all the way through to the tray.
Leelee R. says
There are only two of us so I would like to be able to make one loaf at a time. Do you have a breakdown for that because I know sometimes when I just halve the recipe it doesn’t work out. Thanks for these great recipes!
Cathy says
The dough will keep in the fridge for two weeks. Just pull off an equal hunk and bake at different times.
susan says
we just made your artisan bread. it is so yummy!
Kadi says
I’m just curious…the recipe calls for oil but the directions do not say when to add it. When is the appropriate time?
I just took two of these out of the oven and they turned out having a great flavor, but kind of dense and small. My yeast was not expired so I’m wondering if the temperature of the water was not warm enough would that cause the dough not to rise as much?
I let sit for 3 hours and refrigerated over night, however I only had whole wheat bread flour on hand.
Cathy says
Oil is for roasting garlic. Whole wheat flour will not result in a fluffy big loaf.
Joni says
So I brought the ingredients make this and realized after I had grabbed multi grain bread flour. Threw it together anyways as it was a cold rainy day and may as well try it. First attempt at this kind of baking, (can’t say it’s really my thing but this looked amazing and seems super simple). Just pull it out of the oven a while ago and took first taste. It’s a little dense and didn’t rise like I believe it should but all in all the result still very good. I think it would be quite fantastic as a baguette so may try it in a different shape for the other half of the doughty I baked just one loaf to try. Anxious to try it with proper flour but can’t say this result was not worth the small amount of effort on a lazy day. Thanks for the recipe!!
Cathy says
The proper flour will make all the difference.
Joni says
Okay so follow up on the multi grain flour baguette attempt. Baked 1/4 of dough 25 min with just free shaping it and baking as I saw in another recipe. Result was a little flat so I hunted down a baguette baking contraption that was a mesh style tray shaped like an over size taco holder. Result was lovely rounded and perfect baguette. Texture is great and looks lovely, guess it pays to experiment when your in a pinch. Will be something I will be serving often, wonderful for sandwiches!!
beth says
So grateful I ran across your blog while searching for a rosemary bread recipe! This is the best bread I’ve ever made. Our new favorite! Thank you!
Erin Kester says
I’ve only made bread a couple times in my life and this was so easy and mine turned out exactly like the picture! Tastes amazing and has a nice, airy inside with a great crunch on the outside. Awesome recipe!! I can’t wait to try other flavor like cracked pepper/garlic and sharp cheddar/jalapeño. This will be our go-to recipe for artisan bread. Thank you!
Abb says
Instead of using Rosemary, do you think I could add cheese instead? Do you know how I would go about doing this? It looks amazing!
Cathy says
Here is basically the same bread but I changed it up with bacon and cheese. https://noblepig.com/2013/01/easy-artisan-bacon-cheese-bread/
Jay the viking says
I have made the bacon cheddar version of this bread, and I’m glad to see in not the only one who has made this connection. I was planning to do this today… Looks like you beat me to it Cathy.
Kimberly says
I’m making this recipe now. Just a few minutes left before it goes into the fridge. Normally I bake my artisan breads in a covered vessel. I’m excited to try the baking pan of water instead, however, my metal baking pan options are limited. I have a metal, shallow baking sheet or a few metal cake/pie pans. Can I make any of these work? How much water are we talking?
Cathy says
1-1/2 cups should work.
Meagen says
can you replace the garlic cloves with garlic powder? if so how much garlic powder is needed???
Cathy says
No, garlic powder cannot replicate the taste of fresh roasted garlic.
Tricia Lee says
I tried my hand at this recipe and the results were awesome.
Tried to post a picture of my loaves but couldn’t figure out how to do it. I made my loaves lengthwise with a split down the center.
Colleen Coger says
I love the Artisan Bread in 5 method and your recipe sounds great. My question is that
most of the ABin5 recipes call for 1 1/2 Tbsp. yeast. Why would you need to use 2 Tbsp?
Cathy says
This is my version of the recipe and what I feel works better with the type of flour I use and amounts. I’ve made it hundreds of times so I know it works well.
Karen Fulbright Pollack (@figandscallion) says
Wonder how this would come out in an Emile Henry terra cotta lidded loaf pan, as opposed to free form on baking sheet? It’s supposed to yield an artisan crusty result to bread…I have one but haven’t used it yet.
Elise says
Do you have a conversion you like for using a starter rather than active dry yeast?
Cathy says
I don’t.
Cathy says
absolutely delicious and easy.I baked it on my pizza stone but only chilled it 4 hours.Since i love rosemary I will add a bit more next time and maybe some on top too .
Rob says
Cathy, this may be a dumb question, but does this require a bread maker? It’s not clear from your early instructions about mixing with a wooden spoon and then covering. I don’t have a bread maker, and have been successfully making bread dough with my food processor (book: The Best Bread Ever), so was hoping I can make this too.
Cathy says
This does not need any special equipment…no food processor either.
Missus says
I baked this bread this morning with a very minor alteration. I used about a 1/4 cup of hot green chile (thawed from frozen and then chopped) and left out the rosemary. I needed to bake it a little bit longer because of the extra moisture but it was incredibly delicious! I had to write a comment to say how much I loved this recipe! Easy enough for a beginner baker like myself also.
Sheryl says
Can this be started in a bread machine?? The bread machine (if you think it would be ok) would take the ingredients and once set for the dough machine proofs the yeast and mixes etc., then can add the garlic and rosemary it will mix through and at that poi t I would be able to place in baki g pan and then oven after shaping and cutting the “X” on top.
Time saver and the 3 hours for rise would all be done in machine.
Please provide your opinion. Thanks so much
Cathy says
You do not need a bread machine for this recipe.
Margareta says
On my to-try list! Thanks for sharing!
Susan Lesmeister says
Very very delicious! Make it all the time!
Nels says
Would it be possible to bake the entire recipe as one loaf? I’d like to get really large slices similar to the Seattle brand sourdough you can buy in stores.
Cathy says
I have never done it. Your cooking time is going to really increase and I would use a thermometer to figure out when the middle is done or do a couple test runs.
Laura Jane says
Incredible flavor and hearty consistency! Oh, boy! I made this recipe with gluten free flour and am extremely satisfied with it! I love garlic and homey spices. Thank you for posting this recipe! I put the other half of the dough in the freezer and can’t wait to make more.
Cathy says
Glad you enjoyed it and were able to modify it successfully to your needs.
Candice says
Just made this today. Great recipe!
I was a bit concerned at how wet it was before putting it in the oven, but it turned out beautifully! My boyfriend loves it, and I’ve already passed along the recipe to a friend who only saw a picture. Can’t wait to make it again for my mom’s birthday dinner!
Thanks!
Lynn says
I made this bread and it was yummy but dense. I let it rise for over 24 hours.. Baked it in a dutch oven. It looks beautiful and taste great, but I was disappointed that had very little air pockets. I used bread flour but will try making it again with all purpose flour
Cathy says
Make sure to weigh your flour…830 grams and bake on a baking sheet with a tray of water according to the recipe.
Pam says
Made this and the flavor was delicious! But it was half the height of your pic, not brown and very dense and wet. Guests loved the flavor I will try again but any suggestions? I followed your recipe Exactly! Put in the fridge at 9pm baked at 4pm next day could that be the problem? Thought it should be lighter texture. Thanks!
Cathy says
Assuming you used bread flour. Measurements have to be exact. It could be a little too much water and not weighing flour could make a big difference. Your oven temperature could be off too leaving it wet so it sounds like you need to cook it longer possibly.
LB says
I made this bread last weekend and it was amazing. I gave my daughter and son-in-law a loaf and they called about an hour later to tell me it was the best bread they ever had! In the future, I’m going to cut in half the roasted garlic cloves so I can have the taste throughout the bread. Thanks for a phenomenal EASY bread recipe! Keep them coming!
Amy Nolin says
I used this recipe to make homemade bread for the first time. It came out just like the picture and tasted great. I was really happy with it. The only thing I’d like to improve next time around is that it came out slightly doughy in the middle still. I’m assuming I just need to keep it in longer next time, I just don’t want to dry it out! Overall, great first time bread making experience!
Cathy says
This bread does not dry out..cook it longer as every oven is different.
Disappointed Baker says
I’m no novice to making bread, but this loaf was terrible. It was incredibly bland, and was a huge disappointment after waiting so long for it to rise, and then having to wait overnight. A complete waste of ingredients, right in the trash.
Cathy says
Something definitely went wrong..you used too much flour or not enough. I make this bread almost daily and it’s always perfect, so not sure what went wrong for you. It’s one amazing loaf.
Christine says
My dough has only been prooving for about 30 minutes and its already up against the saran wrap… This is my first time ever making bread and I’m worried. Is that okay, or should it have more room?
Cathy says
That’s good. Your bowl just might be too small.
Shira says
My first time baking loaves of bread, and this recipe is so good! I weighed the flour, and used 2 tsp of dried crushed rosemary instead of fresh. I baked one loaf to start with, and will bake the other one soon. I just need to bake it a little longer than 30 minutes, as the middle was slightly doughy still, but still very edible and very delicious. Really easy to make!
Bob in Argentina says
Can I assume that it goes into the oven cold from the refridgerator? And, is it “coarse” kosher salt?
Cathy says
Yes. “Let rest on the baking tray for 20 minutes. Right before placing in the oven, score top of bread with an “x” or other decorative mark, cutting right through the dough.”
Bob in Argentina says
One more question. This is the first time I have tried this. I used my 4 quart crock pot for mixing rising. After two hours it was up to the top so I decided I would just put it in the fridge till tomorrow. Now, after 4 hours I notice that it has fallen a couple of inches…what you think?
Cathy says
It’s totally fine.
Sanchita says
I’m new to breadmaking, but I was curious, I just bought a breadmaker so how would I make this recipe in a breadmaker?
Cathy says
I have never used a breadmaker so I have no idea. This recipe is so easy it doesn’t need a breadmaker.
mwood says
Ive made this recipe several times before as is and LOVED it. it turns out perfectly.
Thinking of braiding the dough and turning it into a wreath, will it mess up the rise?
Thanks!
Fatemeh hajiani says
Hello. Where and when do we use the olive oil and how much? Tks
EasyRoasted5 says
This roasted garlic-rosemary Bread was simple and delicious!This truly is my new favorite Bread recipe Thank you for this delicious Bread recipe.
Noel says
Hi Hello hey, Happy new year !
Great recipe
Candice says
I have probably made close to 60 loaves of bread with this recipe, so figured I should write to say just how much I love this recipe. The best thing is, that without the garlic and rosemary you have a basic bread recipe that can host such a wide variety of flavours.
Some of my go-to varieties are:
Cheddar & Chive (an absolute crowd pleaser!)
Black Olive & Feta (sometimes add sun-dried tomato)
Walnut
Cinnamon Raisin
Thanks for such a great, easy to follow recipe! I use it all the time!
Napoya says
This bread is by far one of the best breads I’ve eaten in a long time! It is also easy to get together. Will definitely make it again!!
Emily Strong says
I tried freezing a batch of dough (doesnt hurt to try) and it exhausted the yeast. Has anyone tried refrigerating the dough for a couple days, maybe three?
Emily Strong says
What did you do with the olive oil? I used it to oil the bowl I was rising in. This bread is always a huge hit!
Dylan says
I accidentally left my bowl out on the counter over night. Will this majorly effect my dough?
jp says
soooo delicious……made a couple of loaves a few months ago. DELICIOUS!!!
wanting to make smaller loaves to gift. any advice?
Heather says
I’ve been making this bread for almost 2 years now and it is still my go-to recipe! I even use my own sour dough starter and it comes out amazing. I’ve experimented with all kinds of different recipes, but this is the one I always have come back to. It’s so easy and it’s the most amazing bread I’ve ever tasted. I am about to put some in the oven and I’ve omitted the garlic and rosemary bc my kids just want to have it for peanut butter and jelly. Last year I made this and the cheddar bacon ones and have them away as Christmas presents with homemade apricot jam and pepper jelly. They were a HIT! Still getting requests!
Kyla says
Wondering how long i can leave the dough in the fridge? I want to make the dough a few days ahead
Cathy says
That’s totally fine.
Madisyn says
Made this and it blew everyone mind! Crazy good and easy
Thanks for the recipe!
CAROLE READER says
I have made this recipe so many times and it is a hit every time! Yesterday I decided to try something new. I added dried apples, dried cranberries and roasted walnuts ( instead of the garlic and rosemary). It turned out awesome!! Great to make grilled cheese sandwiches!
Michael Ross says
This sounds fabulous … and I have so much rosemary growing in my garden!
If cook this bread to a temperature rather than by time, what temperature should be the target for a fully cooked loaf?
Jackie says
Just made this today! This is my second time ever baking bread, with the first one being plain white bread. This tastes AWESOME.
Taylor says
Could this bread be formed into more of a baguette shape? I’m considering making this for thanksgiving and serving it sliced with some sort of cheese or dip.
Cathy says
I have never done , but why not. Likely different cooking time though. However, the dough is very sticky so it might be challenging to make in that shape unless you do several small ones.
Dawn says
By far one of the best breads I have ever had! Easy to make too. I made it as a “welcome to the neighborhood” gift for my neighbor and they also raved about it.
I also made a version with less Rosemary, and added sauteed mushrooms and chunks of Swiss cheese. Thank you so so much for this recipe!!
Rebecca Hope says
Turned out wonderful.
Lori says
I just got a Dutch oven and was wondering if you’ve ever made this in a Dutch oven?
Cathy says
yes that’s how you make it.
Carol says
This came out beautifully! I did not have a bannettone so I used a towel lined bowl and it worked fine. Such a beautiful, tasty loaf of bread.
Bev says
If refrigerating the
dough overnight, at what point in the recipe do you refrigerate it. Before the first rise, after the first rise, etc. i am assuming you do not shape until after it comes out of the refrigerator. Does it need to rise after coming out of the refrigerator?
Cathy Pollak says
If you’re refrigerating the dough overnight, do it after the first rise and before shaping. Cover the bowl and refrigerate the dough for up to 24 hours.
The next day, let the dough sit at room temperature for 30 to 60 minutes if it feels very cold and tight, then shape it, add the roasted garlic filling, and proceed with the second rise as written.
Yes, it still needs the second rise after shaping. The overnight refrigeration slows fermentation but doesn’t replace the final proof that gives the loaf its volume and texture before baking.
Carol says
My bread came out so beautiful and tasty, thanks for the recipe.
Liam says
Excellent bread recipe. It turned out great.
Laura says
This is my favorite bread recipe of yours. It always turns out so good.
Karen says
Love how this bread turned out. It had a perfect crust and the dough gave me no trouble at all.
Madison says
My first time on your site. Like the detailed recipes, and I am going to try this one. One complaint I have (and it happens on many of these blogs) is the size of the dutch oven is never given. I have 4 sizes of dutch ovens, and confident I can figure it out. But it amazing that so much thought and effort is put into these recipes and something as basic as the size of the cooking vessel/pan is omitted.
Cathy Pollak says
Good point. I use a 5.5-quart Dutch oven for this bread, but a 5- to 6-quart Dutch oven works well. Larger Dutch ovens will still work, but the dough may spread a little wider before it starts rising upward.